Go Back
In the world of snacks, few treats are as universally loved as bliss balls. These bite-sized delights are not only delicious but also incredibly easy to make, making them a perfect choice for busy lifestyles or quick energy boosts. Today, we're diving into the delightful recipe for Crunchy Peanut Butter Bliss Balls. These little bites of joy combine the rich flavors of peanut butter with the satisfying crunch of Rice Krispies, topped off with optional chocolate chips or nuts for an extra layer of indulgence. Whether you're looking for a snack for the kids, a post-workout treat, or simply a sweet pick-me-up, these bliss balls will surely satisfy your cravings. Let’s explore how to create these irresistible snacks step-by-step.

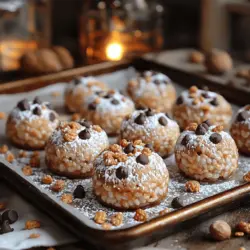
Rice Krispie Peanut Butter Balls

Discover the ultimate treat with Crunchy Peanut Butter Bliss Balls! These easy, no-bake snacks combine creamy peanut butter and crispy Rice Krispies, delivering a delightful crunch in every bite. Perfect for kids, a post-workout energy boost, or a sweet indulgence anytime, these bliss balls are customizable with your favorite add-ins like chocolate chips or nuts. Packed with protein and healthy fats, they make a guilt-free snack choice that everyone will love. Learn how to make these delicious bites step-by-step!

Ingredients
  

3 cups Rice Krispies cereal

1 cup creamy peanut butter

½ cup honey or maple syrup

1 teaspoon vanilla extract

1 cup powdered sugar

½ cup mini chocolate chips (optional)

½ cup chopped nuts or seeds (optional)

Pinch of salt

Instructions
 

Prepare Your Workspace: Line a baking sheet with parchment paper for easy cleanup and to prevent sticking.

    Mix the Wet Ingredients: In a large mixing bowl, combine the creamy peanut butter, honey (or maple syrup), and vanilla extract. Stir until the mixture is smooth and uniform.

      Combine Dry Ingredients: In a separate bowl, mix the Rice Krispies cereal, powdered sugar, and a pinch of salt. If using, also add the mini chocolate chips or chopped nuts/seeds at this stage for added texture and flavor.

        Combine Both Mixtures: Gradually add the dry ingredient mixture into the wet mixture, stirring gently but thoroughly until the Rice Krispies are well-coated and the mixture holds together.

          Shape the Balls: Using your hands, take a small amount (about 2 tablespoons) of the mixture and roll it into a ball. Place the formed ball onto the prepared baking sheet. Repeat the process until the mixture is used up.

            Chill: Once all the balls are formed, place the baking sheet in the refrigerator for about 30 minutes to allow them to firm up.

              Store and Serve: After chilling, serve immediately or store the balls in an airtight container in the refrigerator for up to one week.

                Prep Time, Total Time, Servings: 15 minutes | 45 minutes | 20 balls