Heavenly S’mores Bars Recipe
Introduction
S’mores have long been cherished as a quintessential treat, evoking memories of summer nights spent around a crackling campfire. This delightful combination of graham crackers, gooey marshmallows, and rich chocolate has captivated the hearts and taste buds of many. Whether enjoyed during family camping trips or backyard barbecues, the simple yet indulgent nature of S’mores makes them a timeless favorite.
However, for those seeking a more convenient and equally delicious way to enjoy this beloved treat, S’mores Bars offer the perfect solution. These bars encapsulate the classic flavors and textures of traditional S’mores but come in a portable and easy-to-serve format. Ideal for gatherings, parties, and family desserts, S’mores Bars are a crowd-pleaser that can be enjoyed any time of year, no campfire required.
Understanding S’mores Bars
So, what exactly are S’mores Bars? At their core, S’mores Bars are a baked dessert that combines the signature components of a S’more into a cohesive, layered treat. Unlike traditional S’mores, which require roasting marshmallows over an open flame, S’mores Bars are baked in a pan, allowing for a quicker and less messy preparation. This unique format not only simplifies the process of enjoying S’mores but also enhances the flavor by allowing the ingredients to meld beautifully during baking.
The history of S’mores dates back to the early 20th century, with the first recorded recipe appearing in a Girl Scouts publication in 1927. This nostalgic treat has since evolved, inspiring a variety of dessert forms, including cookies, ice creams, and now, bars. The cultural significance of S’mores is undeniable, often associated with outdoor activities, celebrations, and the joyful spirit of togetherness. From beach bonfires to backyard picnics, S’mores continue to be synonymous with cherished moments shared with friends and family.
Key Ingredients and Their Roles
Creating the perfect batch of Heavenly S’mores Bars requires a handful of key ingredients, each playing a vital role in achieving the desired flavor and texture. Here’s a look at what you’ll need:
1. Graham Cracker Crumbs: The foundational element for the crust, these crumbs provide a sweet and slightly crunchy base that mimics the traditional S’more’s outer layer. They establish the essential flavor profile and texture.
2. Granulated Sugar: This ingredient enhances the sweetness of the crust, balancing the flavors of the chocolate and marshmallows. The sugar also contributes to the overall texture, ensuring the bars are not too dry.
3. Unsalted Butter: Acting as the binder for the crust, unsalted butter adds richness and depth of flavor. It also helps to achieve the ideal crumbly texture that holds the bars together.
4. Semi-Sweet Chocolate Chips: These chips deliver a rich, chocolatey flavor that is synonymous with S’mores. Their melting quality during baking creates a luscious layer within the bars.
5. Mini Marshmallows: A hallmark of S’mores, mini marshmallows provide the classic gooey texture and sweetness. They create that signature melt-in-your-mouth experience that is both nostalgic and comforting.
6. Milk Chocolate Chips: Offering a contrasting sweetness, milk chocolate chips complement the semi-sweet variety and enhance the overall chocolate flavor of the bars.
7. Vanilla Extract: A small but significant addition, vanilla extract enhances the overall flavor profile, bringing warmth and depth to the dessert.
8. Salt: A pinch of salt is essential to balance the sweetness of the other ingredients. It elevates the flavor and ensures that the dessert is well-rounded.
For those with dietary restrictions or preferences, there are several substitutions that can be made. Gluten-free graham crackers can easily replace regular ones, while dark chocolate chips can be used for a richer, less sweet alternative.
Step-by-Step Instructions
Now that we’ve covered the background and key ingredients, let’s dive into the initial steps of making your Heavenly S’mores Bars.
1. Preheat Your Oven: Start by preheating your oven to 350°F (175°C). This ensures that your S’mores Bars bake evenly and achieve the perfect texture.
2. Prepare the Baking Pan: Line a 9×13-inch baking pan with parchment paper, allowing some overhang on the sides. This will make it easier to lift the bars out once they have cooled. Lightly grease the parchment paper with cooking spray or butter to prevent sticking.
3. Make the Crust: In a large mixing bowl, combine the graham cracker crumbs, granulated sugar, and melted unsalted butter. Mix until the crumbs are evenly coated and the mixture resembles wet sand. This will form the base layer of your bars.
4. Press the Mixture into the Pan: Pour the crust mixture into the prepared baking pan. Using the back of a measuring cup or your hands, firmly press the mixture down to create an even layer. This step is crucial for ensuring that the crust holds together once baked.
5. Bake the Crust: Place the pan in the preheated oven and bake for about 10 minutes, or until the crust is lightly golden. This initial baking step helps to set the crust and enhances the flavor.
6. Add the Chocolate Layer: Once the crust has baked, remove it from the oven and sprinkle semi-sweet chocolate chips and milk chocolate chips evenly over the warm crust. Allow the chocolate to soften for a few minutes.
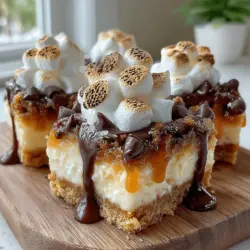
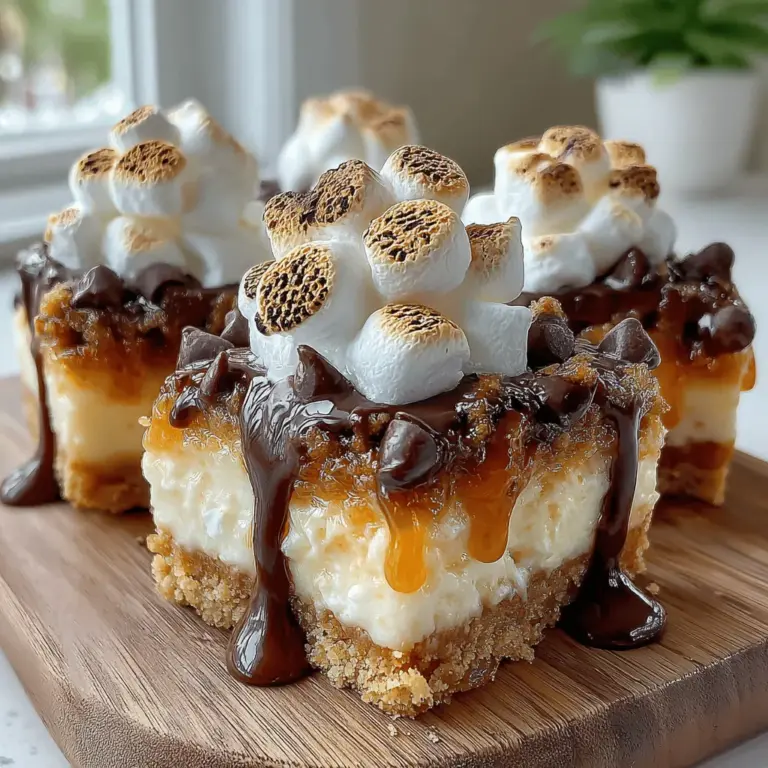
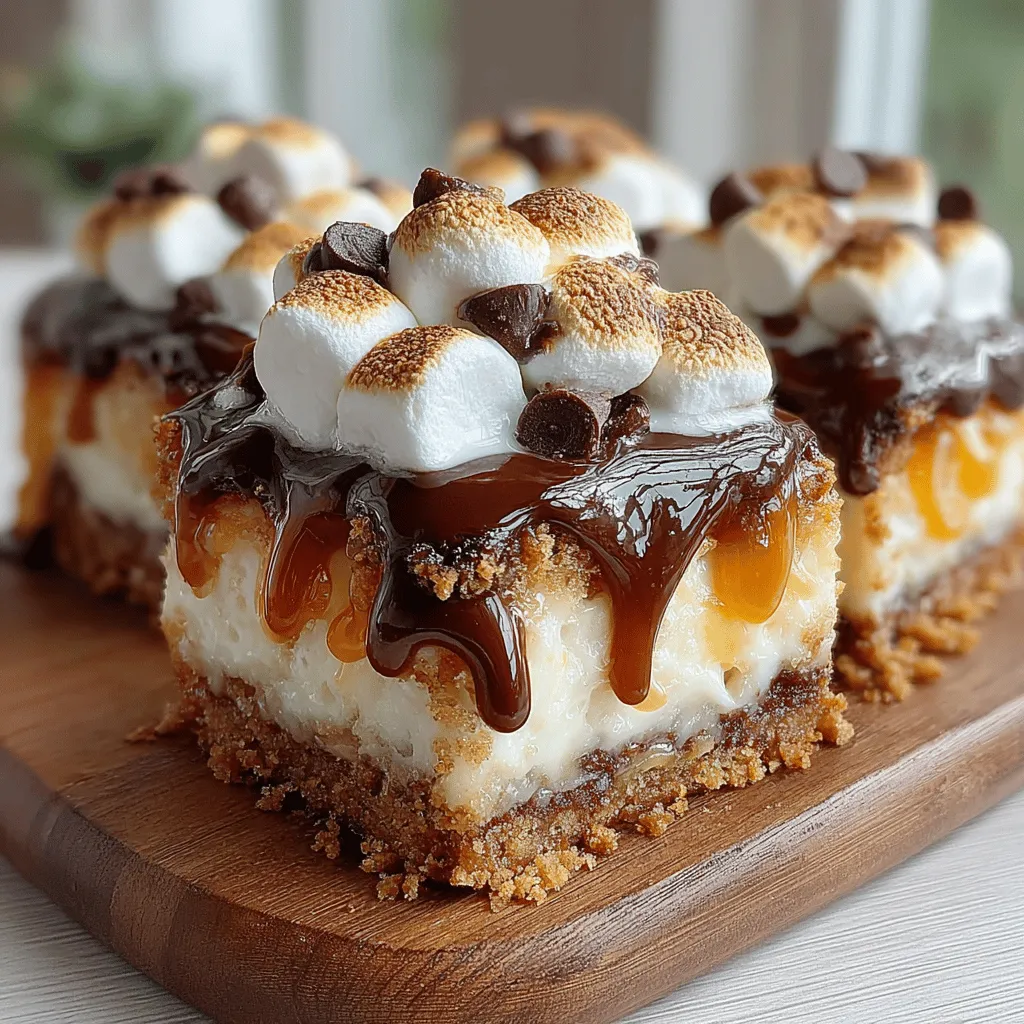
7. Spread the Marshmallows: After the chocolate has softened, scatter mini marshmallows over the chocolate layer. Make sure to cover the surface as evenly as possible for that classic S’mores experience.
8. Return to the Oven: Place the pan back in the oven for an additional 5-7 minutes, or until the marshmallows are puffed and golden brown. This step is where the magic happens, as the marshmallows become irresistibly gooey.
As you embark on this delightful journey to create Heavenly S’mores Bars, take a moment to relish the anticipation of the sweet, melty treat that awaits. The combination of graham crackers, chocolate, and marshmallows, all baked to perfection, will soon transform your kitchen into a warm and inviting space filled with the comforting aroma of this classic dessert. Stay tuned for the next part, where we will delve deeper into tips for serving and storing these delectable bars, ensuring that every bite is a heavenly experience.
Creating the perfect Heavenly S’mores Bars is a delightful journey that combines the nostalgic flavors of graham crackers, chocolate, and marshmallows into a deliciously baked treat. In this section, we will guide you through the essential steps to ensure your S’mores Bars turn out heavenly every time.
Preheat the Oven
Before you start mixing ingredients, preheating your oven is crucial. Set your oven to 350°F (175°C) to ensure an even baking temperature. Temperature control is vital in baking, as it affects how your bars rise and set. An oven that is too hot can cause the edges to burn while leaving the center undercooked, while a cooler oven may lead to a dense texture. Consistency in temperature will provide you with a perfect golden-brown crust and a chewy, gooey interior.
Make the Crust
The crust is the foundation of your S’mores Bars, and crafting it perfectly sets the stage for the rest of the recipe.
Ingredients for the Crust:
– 1 ½ cups graham cracker crumbs
– ½ cup granulated sugar
– ½ cup unsalted butter, melted
– 1 teaspoon vanilla extract
– A pinch of salt
Step-by-Step Process:
1. In a medium bowl, combine the graham cracker crumbs, granulated sugar, and a pinch of salt. This mixture will provide the sweetness and texture that mimics the classic S’mores experience.
2. Pour in the melted butter and vanilla extract, mixing until the crumbs are well-coated and resemble wet sand.
3. Transfer the mixture into a greased 9×9-inch baking pan. Press the crust firmly into the bottom of the pan using the back of a measuring cup or your fingers. Ensure it is evenly distributed and compact to prevent crumbling later.
Pre-bake the Crust
Partially baking the crust is essential for achieving that perfect texture. Pre-baking helps to set the crust, allowing it to hold its shape when layered with the chocolate and marshmallows.
Steps:
1. Place the crust in the preheated oven and bake for 8-10 minutes or until it starts to turn light golden brown.
2. Remove it from the oven and let it cool slightly while you prepare the filling.
Layer the Filling
Now comes the fun part: layering the chocolate and marshmallows! This step is crucial for ensuring every bite is filled with gooey goodness.
Ingredients for the Filling:
– 2 cups chocolate chips (semi-sweet or milk chocolate, based on your preference)
– 2 cups mini marshmallows
Techniques:
1. Evenly sprinkle the chocolate chips over the pre-baked crust. Make sure to cover the entire surface for a consistent chocolate flavor in every bite.
2. Next, add the mini marshmallows over the chocolate. Distributing them evenly ensures that you get a perfect marshmallow-to-chocolate ratio in each bar.
Drizzle with Chocolate
Adding a chocolate drizzle not only enhances the visual appeal but also elevates the flavor profile of your S’mores Bars.
Steps to Drizzle:
1. In a microwave-safe bowl, melt an additional 1 cup of chocolate chips in 30-second intervals, stirring in between until smooth.
2. Once melted, use a spoon or a piping bag to drizzle the melted chocolate over the marshmallows. This step adds a beautiful finish and extra chocolate flavor.
Final Bake
The final baking stage is where all the magic happens. Baking allows the marshmallows to puff up and become beautifully toasted.
What to Look For:
1. Place the pan back in the oven and bake for an additional 10-12 minutes. Watch for the marshmallows to become golden brown and the chocolate to melt beautifully.
2. The bars should appear puffed and set around the edges while still slightly gooey in the center. This texture is what makes S’mores Bars so indulgent.
Cool and Slice
After the final bake, patience is key. Allow the bars to cool completely in the pan, which helps them set fully and makes slicing easier.
Cooling Steps:
1. Let the pan sit at room temperature for at least 30 minutes or until cool.
2. Use a sharp knife to slice the bars into squares. For cleaner cuts, consider wiping the knife with a damp cloth between slices.
Tips for Success
Common Pitfalls:
– Crust Crumbling: Ensure the crust is packed tightly into the pan. If it’s too crumbly after baking, it may not hold together when sliced.
– Overbaking or Undercooking: Keep a close eye on the baking time. The bars should be golden on top but not overly brown.
Importance of Measuring Ingredients:
Accurate measurements are crucial in baking. Use measuring cups and spoons for dry ingredients and a liquid measuring cup for wet ingredients to maintain the right proportions.
How to Tell When the Bars Are Perfectly Baked:
The edges should be golden, and the marshmallows should be puffed and lightly browned. If the center is still jiggly, give it a few more minutes in the oven.
Serving Suggestions
Heavenly S’mores Bars are versatile and can be served in various creative ways:
1. With Ice Cream: Serve warm S’mores Bars with a scoop of vanilla or chocolate ice cream on top for a decadent dessert experience.
2. Drizzled with Caramel: A drizzle of caramel sauce can add an extra layer of flavor that pairs beautifully with chocolate and marshmallows.
3. Beverage Pairings: These bars are perfect with a glass of cold milk, a mug of hot cocoa, or even a cup of coffee. The bitterness of coffee contrasts nicely with the sweetness of the bars.
Presentation Tips:
– Arrange the bars neatly on a serving platter and sprinkle with crushed graham crackers for an appealing look.
– Consider garnishing with a few whole marshmallows or chocolate chips for a decorative touch.
Storage and Shelf Life
To maintain the freshness of your Heavenly S’mores Bars, follow these best practices:
1. At Room Temperature: Store in an airtight container at room temperature for up to 3 days. They may become slightly chewy but will still be delicious.
2. In the Refrigerator: If you prefer a firmer texture, refrigerate them in an airtight container for up to a week.
3. Freezing Instructions: For longer storage, cut the bars into squares and freeze them in a single layer on a baking sheet. Once frozen, transfer them to a freezer-safe container or bag. They can last up to 3 months in the freezer. When ready to eat, let them thaw at room temperature or warm them slightly in the microwave.
Conclusion
Making Heavenly S’mores Bars is not just about following a recipe; it’s about creating a delightful experience filled with flavor and nostalgia. The combination of a buttery graham cracker crust, rich chocolate, and fluffy marshmallows can bring joy to any gathering. Whether you enjoy them as a sweet treat after dinner, at a party, or simply as a comforting snack, these bars are sure to impress.
We encourage you to share this experience with your family and friends. Invite them into your kitchen as you create these delicious bars, celebrating both the delightful flavors and the memories made through this recipe. Happy baking!