Crispy Baked Ranch Chicken Tenders: A Delicious and Healthy Twist on a Classic Favorite
Crispy Baked Ranch Chicken Tenders are a delightful and healthier alternative to traditional fried chicken tenders. This recipe has gained popularity among families and food enthusiasts alike due to its irresistible crunch and flavorful seasoning, all while avoiding the excess calories and fat associated with frying. Whether you’re preparing a quick weeknight dinner, hosting a gathering, or simply looking for a satisfying snack, these chicken tenders deliver on taste and versatility.
One of the main advantages of opting for baked chicken tenders over fried ones is the health benefits. Baked chicken tends to be lower in fat and calories, allowing you to indulge without compromising your dietary goals. By using wholesome ingredients and baking instead of frying, you can create a meal that is both nutritious and delectable. This makes Crispy Baked Ranch Chicken Tenders an ideal choice for families striving to maintain a balanced diet while still enjoying delicious food.
Understanding the Ingredients
To create the perfect Crispy Baked Ranch Chicken Tenders, it’s essential to understand the role of each ingredient in the recipe. The primary components include chicken tenderloins, buttermilk, ranch seasoning, whole wheat flour, and panko breadcrumbs. Each of these ingredients contributes to the final dish’s texture, flavor, and nutritional value.
Chicken Tenderloins: The star of the dish, chicken tenderloins are lean cuts of chicken that are tender and easy to cook. They are perfect for quick meals and can absorb flavors well, making them an excellent choice for marinating.
Buttermilk: One of the key components of this recipe is buttermilk. Marinating the chicken in buttermilk not only helps to tenderize the meat but also enhances its flavor. The acidity in buttermilk breaks down proteins in the chicken, resulting in a juicier and more flavorful end product. Additionally, this creamy base allows the seasoning to adhere better to the chicken, ensuring a punch of flavor in every bite.
Ranch Seasoning: Ranch seasoning is a game-changer for this recipe. Its blend of herbs and spices, including dill, garlic, and onion, elevates the dish by infusing it with a zesty flavor profile. The ranch seasoning not only complements the chicken but also adds a familiar taste that is loved by both kids and adults alike.
Whole Wheat Flour: For those looking to make healthier choices, whole wheat flour is an excellent alternative to traditional all-purpose flour. It adds a nuttier flavor and boosts the nutritional content of the dish with added fiber, making your meal more filling and beneficial for digestion.
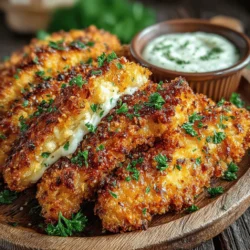
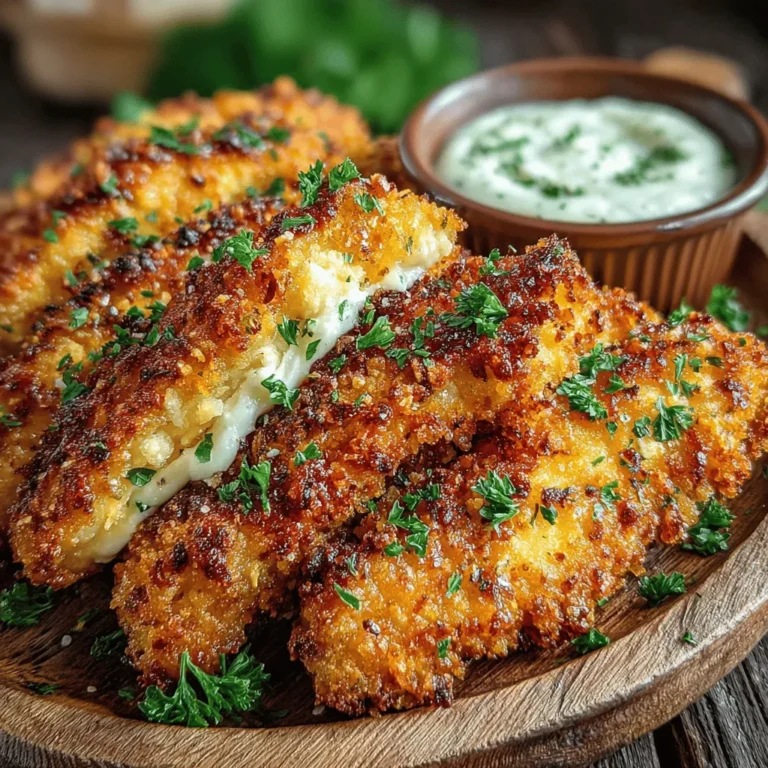
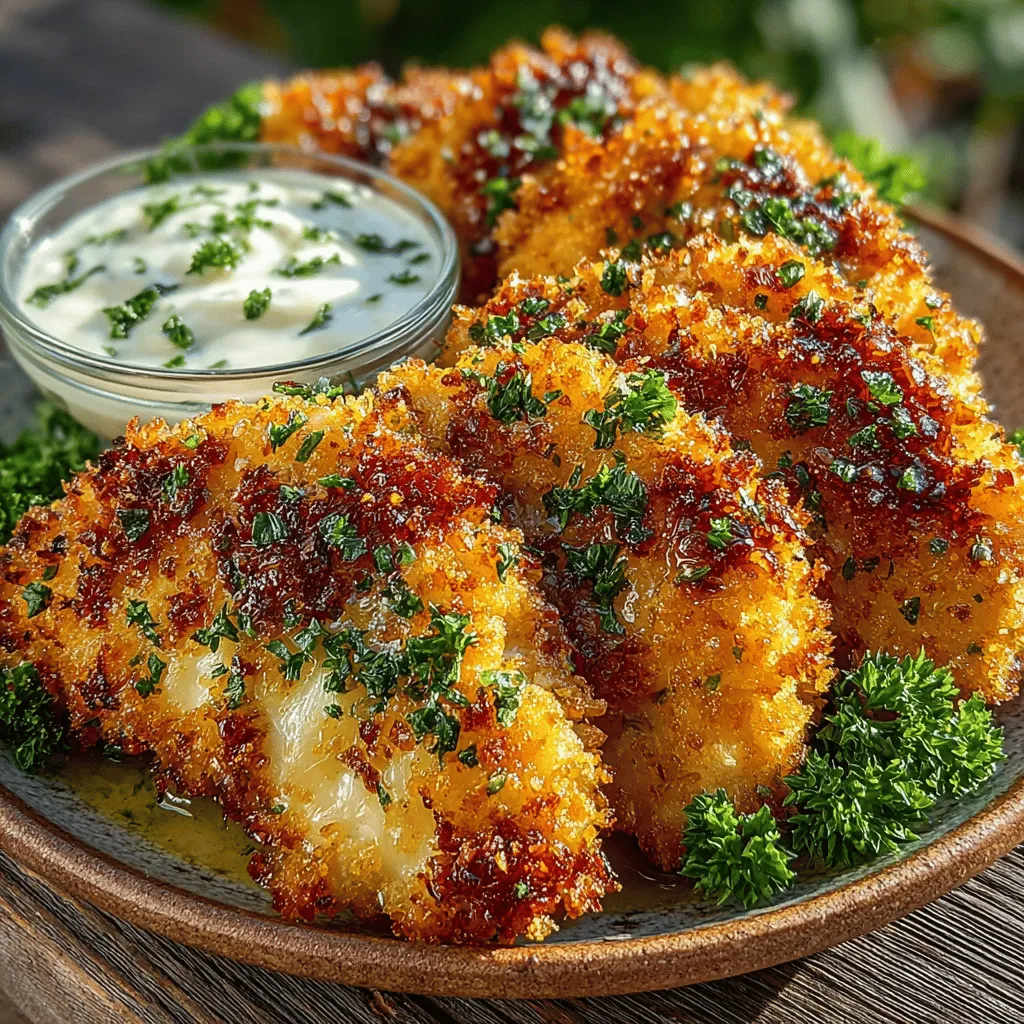
Panko Breadcrumbs: To achieve that perfect crispy texture, panko breadcrumbs are a must. These Japanese-style breadcrumbs are coarser than regular breadcrumbs, resulting in a light and airy crunch when baked. This texture is particularly desirable for chicken tenders, providing a satisfying contrast to the tender meat inside.
Marination Process
Marinating the chicken tenderloins is a crucial step in this recipe that cannot be overlooked. Not only does it enhance the flavor, but it also ensures the chicken remains juicy and tender during the baking process. The marination process allows the buttermilk and ranch seasoning to penetrate the chicken, creating a flavor-packed bite.
Step-by-Step Guidance on Marinating Chicken Tenderloins:
1. Prepare the Marinade: In a bowl, combine buttermilk and a generous amount of ranch seasoning. For added flavor, you can mix in a touch of garlic powder or paprika.
2. Add the Chicken: Place the chicken tenderloins in the marinade, ensuring that each piece is fully submerged. This allows the flavors to infuse evenly throughout the meat.
3. Cover and Refrigerate: Cover the bowl with plastic wrap or transfer the mixture to a resealable plastic bag to marinate. For optimal flavor and tenderness, let the chicken marinate for at least 1 hour. If time allows, marinating for 4-6 hours or even overnight will yield even better results.
4. Consider Variations: While the basic marinade is delicious, feel free to get creative. You can experiment with different herbs and spices, such as smoked paprika, cayenne pepper for a kick, or fresh herbs like parsley or chives.
Preparing the Coating
Once your chicken has marinated to perfection, it’s time to prepare the coating that will give these tenders their signature crispy texture. The breading mixture is essential for achieving that satisfying crunch while also adding a burst of flavor.
Importance of the Breading Mixture: The breading not only provides texture but also serves as a barrier that helps keep the moisture in the chicken tenderloins. This ensures that the chicken remains juicy on the inside while achieving a golden, crispy exterior.
Breakdown of Spices Used: In addition to the whole wheat flour and panko breadcrumbs, the breading mixture can be enhanced with additional spices to elevate the flavors further. Common additions include salt, pepper, garlic powder, and onion powder. These spices not only enhance the taste but also contribute to the overall aroma of the dish.
Tips for Mixing the Coating: To ensure an even distribution of flavors, combine the dry ingredients thoroughly in a shallow dish. This will allow for an even coating when you dredge the marinated chicken. When mixing, consider using a whisk or fork to break up any clumps and ensure that the spices are well incorporated.
Dredging the Chicken Tenders
Dredging the chicken tenderloins in the prepared coating is the final step before baking. This process is straightforward but requires attention to detail to achieve that perfect crispy finish.
1. Preheat the Oven: Before you start dredging, preheat your oven to 400°F (200°C). A hot oven is crucial for achieving a crispy texture.
2. Set Up a Dredging Station: Create a dredging station with three shallow dishes—one for the marinated chicken, one for the flour mixture, and one for the panko breadcrumbs. This organization will streamline the process and minimize mess.
3. Coat the Chicken: Take a marinated chicken tenderloin and shake off any excess marinade. First, dip it into the whole wheat flour mixture, ensuring it is thoroughly coated. Then, move it to the panko breadcrumb mixture, pressing gently to adhere the crumbs. Repeat this process for all the chicken pieces.
4. Arrange for Baking: Place the coated chicken tenders on a baking sheet lined with parchment paper or a silicone mat. This will help prevent sticking and make cleanup easier. Make sure to leave space between each piece to allow for even cooking and crisping.
With the chicken tenders fully prepared and ready for the oven, you’re just moments away from enjoying these deliciously crispy, baked ranch chicken tenders. This recipe not only satisfies your cravings but also provides a healthier twist on a beloved classic, making it a perfect addition to any meal. As you progress through the baking process, the enticing aroma will fill your kitchen, promising delightful bites ahead. Stay tuned for the next steps to take your Crispy Baked Ranch Chicken Tenders from the oven to your table.
Step-by-Step Instructions for the Dredging Process
To achieve the perfect crispy coating on your baked ranch chicken tenders, the dredging process is crucial. This process involves three main steps: coating in flour, dipping in buttermilk, and rolling in seasoned breadcrumbs. Each of these components plays an essential role in creating a tender, flavorful chicken tender with an irresistible crunch.
1. Coating in Flour
Start by placing all-purpose flour in a shallow dish. This step is important as the flour acts as a base layer that helps the buttermilk adhere to the chicken. It creates a dry surface that allows the wet buttermilk to cling effectively. Season the flour with a pinch of salt and pepper to enhance the overall flavor of the chicken.
2. Dipping in Buttermilk
Next, dip each chicken tender into the buttermilk. Buttermilk not only adds moisture but also tenderizes the chicken, resulting in juicy tenders. The acidity in buttermilk helps to break down the proteins in the chicken, making it more tender while also adding a subtle tanginess. Ensure each piece is fully submerged for even coverage.
3. Rolling in Seasoned Breadcrumbs
Finally, roll each tender in the seasoned breadcrumbs. Use panko breadcrumbs for an extra crispy texture. You can mix the breadcrumbs with ranch seasoning for that signature flavor. It’s essential to press the breadcrumbs firmly onto the chicken to ensure that they adhere well during baking. This step guarantees that every bite is coated in deliciousness.
To ensure optimal adherence, allow the coated tenders to rest for a few minutes before baking. This resting period helps the coating set, creating a thicker crust as they bake.
Baking to Perfection
The key to achieving perfectly crispy baked ranch chicken tenders lies in the baking temperature and time.
Importance of Oven Temperature and Baking Time
Preheat your oven to 425°F (220°C). This high temperature is vital for achieving that golden-brown finish and crispy texture without frying. Baking at this temperature allows the heat to penetrate the chicken while crisping up the coating.
Arrange the tenders on a baking sheet lined with parchment paper or a silicone baking mat. Make sure to leave space between each tender to allow for even cooking and crisping. Crowding the pan can lead to steaming rather than baking, affecting the crunch factor.
Instructions on Arranging Tenders on the Baking Sheet
Place the dredged chicken tenders on the prepared baking sheet in a single layer. If necessary, use a wire rack in the baking sheet to elevate the tenders, allowing hot air to circulate around them, enhancing crispiness.
The Role of Olive Oil Spray in Achieving a Golden Finish
To achieve a beautiful golden color and additional crispness, lightly spray the tenders with olive oil before placing them in the oven. The oil helps to promote browning and gives the chicken a mouthwatering appearance.
Bake the chicken tenders for 20-25 minutes or until the internal temperature reaches 165°F (74°C) and the coating is golden brown. Remember to flip the tenders halfway through the baking time for even cooking.
Serving Suggestions
Crispy baked ranch chicken tenders are incredibly versatile and can be served in numerous delicious ways.
Ideas for Dipping Sauces
Pair your chicken tenders with a variety of dipping sauces to elevate the dining experience. Here are a few popular options:
– Ranch Dressing: Stick with the classic ranch flavor for a perfect match.
– Buffalo Sauce: For those who enjoy a bit of heat, buffalo sauce adds a spicy kick.
– Honey Mustard: The sweetness of honey balances the savory flavor of the chicken.
– BBQ Sauce: A tangy BBQ sauce complements the crispy coating beautifully.
Suggestions for Side Dishes
Complement your chicken tenders with side dishes that enhance the meal. Consider these options:
– Fresh Salad: A crisp garden salad with a light vinaigrette adds freshness to the plate.
– Roasted Vegetables: Oven-roasted broccoli or carrots offer a nutritious and colorful side.
– Sweet Potato Fries: For a fun twist, serve with sweet potato fries, which provide a sweet contrast to the savory chicken.
Discussion on Garnishing with Fresh Parsley
For an extra touch of color and flavor, garnish the plate with freshly chopped parsley. Not only does this enhance the presentation, but it also adds a hint of freshness that complements the richness of the chicken tenders.
Nutritional Information
Understanding the nutritional content of your meals is essential for maintaining a balanced diet. Here’s a breakdown of the nutritional profile per serving of crispy baked ranch chicken tenders:
– Calories: Approximately 250-300 calories
– Protein: Around 25 grams
– Fat: 10 grams
– Carbohydrates: 30 grams
– Fiber: 2 grams
Health Benefits of the Ingredients Used
Baked chicken tenders are a healthier alternative to traditional fried versions. By baking instead of frying, you significantly reduce the amount of added fats and calories. The use of whole ingredients, such as chicken breast and whole grain breadcrumbs, provides lean protein and essential nutrients without the excess calories found in fried foods.
Comparison with Traditional Fried Chicken Tenders
Traditional fried chicken tends to be high in calories and unhealthy fats due to the frying process. In contrast, baked ranch chicken tenders offer a healthier option that retains the savory flavor and crunch without the guilt. Making this simple switch can help you maintain a balanced diet while still enjoying your favorite comfort foods.
Conclusion
Crispy baked ranch chicken tenders are not only a delightful dish but also a healthier twist on a classic favorite. The combination of tender chicken, flavorful ranch seasoning, and a crispy coating makes these tenders a hit at any meal.
Encourage family and friends to try this recipe for a nutritious option that doesn’t sacrifice taste. With easy preparation and versatile serving suggestions, these chicken tenders can easily find a place in your weekly meal rotation. Whether served as a main dish, a snack, or at gatherings, they promise to be a crowd-pleaser.
Reflecting on the versatility of chicken tenders, they can be enjoyed in many ways—from wraps and salads to meal prep options for busy weekdays. Try this recipe today for a delicious and health-conscious dish that everyone will love!