Frozen Coconut Yogurt Cookie Discs: A Delicious and Healthy Treat
In the world of desserts, where indulgence often takes precedence, a refreshing shift towards healthier options has gained momentum. One such delightful creation is the Frozen Coconut Yogurt Cookie Discs—an innovative treat that marries the creamy goodness of yogurt with the tropical essence of coconut. This recipe is not only a feast for the senses but also a guilt-free indulgence, perfect for those seeking a nutritious yet satisfying dessert. The Frozen Coconut Yogurt Cookie Discs are easy to prepare, making them an ideal option for both health-conscious eaters and dessert aficionados.
The Growing Trend of Coconut and Yogurt in Desserts
Coconut and yogurt have emerged as popular ingredients in the dessert realm, celebrated for their numerous health benefits and versatile flavors. Coconut, known for its natural sweetness and rich texture, has made its way into various recipes, providing a tropical flair that many find irresistible. Meanwhile, yogurt—particularly coconut yogurt—offers a creamy consistency and a tangy flavor that complements sweetness perfectly. The combination of these two ingredients is not only delicious; it also aligns with modern dietary preferences, such as gluten-free, dairy-free, and low-sugar diets. As a result, Frozen Coconut Yogurt Cookie Discs have become a favored choice for those who want to indulge without compromising their health goals.
Understanding the Ingredients
Creating these delightful cookie discs involves a selection of wholesome ingredients that contribute to their nutritional profile and flavor. Each component plays a vital role in ensuring that the final product is both satisfying and health-conscious.
The Role of Coconut Flour
Coconut flour is a standout ingredient in this recipe, primarily due to its gluten-free nature. For those with gluten sensitivities or those simply looking to reduce their gluten intake, coconut flour serves as an excellent alternative to traditional wheat flour. Its high fiber content not only aids in digestion but also helps to maintain a feeling of fullness, making it a smart choice for anyone trying to manage their weight. Furthermore, coconut flour has a subtly sweet flavor that complements the other ingredients beautifully.
Benefits of Shredded Unsweetened Coconut
Adding shredded unsweetened coconut not only enhances the texture of the cookie discs but also contributes a natural sweetness that is hard to resist. This ingredient is packed with healthy fats, particularly medium-chain triglycerides (MCTs), which have been linked to improved metabolism and energy levels. Additionally, the fiber content in shredded coconut supports digestive health, making it a beneficial addition to this dessert.
Natural Sweeteners: Honey vs. Maple Syrup
When it comes to sweetening the Frozen Coconut Yogurt Cookie Discs, two popular options are honey and maple syrup. Both natural sweeteners offer distinct flavors and health benefits. Honey provides a rich, floral sweetness and contains antioxidants, which can support overall health. On the other hand, maple syrup, with its unique caramel-like taste, is also rich in antioxidants and contains essential minerals like manganese and zinc. Depending on the flavor profile you prefer, either option can enhance the sweetness of the cookie discs while keeping them wholesome.
The Importance of Coconut Yogurt
Coconut yogurt is a key ingredient in this recipe, bringing not only flavor but also a wave of health benefits. Being dairy-free, it is an excellent choice for those who are lactose intolerant or following a vegan lifestyle. Coconut yogurt is rich in probiotics, which promote gut health and can aid in digestion. Furthermore, it adds a creamy texture that is essential for achieving the perfect cookie disc consistency.
Coconut Oil: A Healthier Fat Choice
Incorporating coconut oil into the recipe provides a source of healthy fat that can elevate the overall nutritional value of the cookie discs. Coconut oil is high in medium-chain triglycerides (MCTs), which are known to be metabolized differently than other fats, potentially aiding in weight management and energy production. The inclusion of coconut oil not only enhances the flavor of the cookies but also contributes to their moistness, ensuring a delightful bite every time.
Flavor Enhancers: Vanilla Extract and Baking Soda
To round out the flavor profile of the Frozen Coconut Yogurt Cookie Discs, vanilla extract and baking soda are included in the mix. Vanilla extract adds a warm, aromatic quality that pairs perfectly with the coconut and yogurt, enhancing the overall taste experience. Meanwhile, baking soda acts as a leavening agent, ensuring that the cookies rise to the perfect height while maintaining a soft and chewy texture.
Step-by-Step Instructions to Make Frozen Coconut Yogurt Cookie Discs
Now that we have a clear understanding of the ingredients and their benefits, let’s move on to the exciting part—making the Frozen Coconut Yogurt Cookie Discs. This step-by-step guide will walk you through the process, ensuring that you create delicious, healthy cookie discs with ease.
Preparing the Dough
1. Gather Your Ingredients: Start by collecting all the required ingredients: coconut flour, shredded unsweetened coconut, your chosen natural sweetener (honey or maple syrup), coconut yogurt, coconut oil, vanilla extract, and baking soda. Having everything at hand will streamline the process and make it more enjoyable.
2. Melt the Coconut Oil: If your coconut oil is solid, gently melt it in a microwave or on the stove until it becomes liquid. Be careful not to overheat it; a low heat is sufficient.
3. Combine Wet Ingredients: In a mixing bowl, combine the melted coconut oil, coconut yogurt, and your chosen sweetener. Whisk these together until the mixture is smooth and well-blended. This step is crucial, as it ensures that the sweetener is evenly distributed throughout the dough.
4. Mix Dry Ingredients: In a separate bowl, combine the coconut flour, shredded unsweetened coconut, baking soda, and a pinch of salt. Mixing the dry ingredients together first will help to prevent clumping and ensure an even distribution of the baking soda.
5. Combine Wet and Dry Ingredients: Gradually add the dry mixture to the wet ingredients, stirring continuously. The dough will start to come together, but it may appear crumbly at first. Don’t worry; this is normal with coconut flour.
6. Knead the Dough: Once the ingredients are combined, use your hands to knead the dough gently. This will help it bind together. If the dough is too dry, you can add a splash of coconut yogurt or a little water to help moisten it.
7. Shape the Cookie Discs: Divide the dough into equal portions and roll each piece into a ball. Flatten each ball into a disc shape, about half an inch thick. You can use your hands or a rolling pin to achieve the desired thickness.
8. Prepare for Freezing: Line a baking sheet with parchment paper and place the shaped cookie discs on it. Ensure that there is enough space between each disc to allow for slight expansion during freezing.
By following these steps, you will have prepared the dough for your Frozen Coconut Yogurt Cookie Discs, setting the stage for the final steps in this easy yet delectable recipe. Stay tuned for the next part of this article, where we will detail the freezing process and how to serve these delightful treats!
Creating the perfect Frozen Coconut Yogurt Cookie Discs requires careful attention to detail, particularly in the mixing and combining stages. These tasty treats are not only delicious but also provide a healthy alternative to traditional cookies. Let’s delve into the remaining steps of this delightful recipe, along with tips, nutritional information, and serving suggestions to ensure your cookie discs are a hit!
Mixing Dry Ingredients
To ensure your Frozen Coconut Yogurt Cookie Discs have the best texture, it’s crucial to properly mix your dry ingredients. This step is often overlooked, but it lays the foundation for your cookies’ overall consistency and taste.
Start by sifting together your flour (or gluten-free alternative), baking powder, and a pinch of salt. Sifting not only removes lumps but also aerates the flour, allowing for a lighter texture in your finished product. Once sifted, whisk the dry ingredients together in a large mixing bowl until they are well-combined. This step helps to evenly distribute the leavening agents throughout the flour, preventing any uneven rising during baking.
Mixing Wet Ingredients
Next, let’s focus on the wet ingredients. For this recipe, you will typically use coconut yogurt, a sweetener of your choice (like maple syrup or agave), and any flavorings such as vanilla extract or almond extract.
To achieve a smooth and consistent mixture, it’s essential to combine these wet ingredients thoroughly. Use a whisk or an electric mixer on low speed to blend the coconut yogurt and sweetener until it’s creamy. Gradually add in the flavorings while continuing to mix. The goal here is to ensure that all ingredients are fully integrated before combining with the dry mix. This creates a homogeneous batter that will yield better results when baked.
Combining Mixtures
Now comes the crucial step of combining the dry and wet mixtures. Make a well in the center of your dry ingredients and pour in the wet mixture. Gently fold the mixtures together using a spatula or wooden spoon. Be careful not to overmix; this can lead to tough cookies. You’re looking for a dough that is slightly sticky but holds together when pressed.
If your dough seems too dry, add a tablespoon of coconut milk or water at a time until you reach the desired consistency. Conversely, if your dough is too wet, sprinkle in a bit more flour until it firms up. This flexibility allows you to adjust based on the humidity and temperature of your kitchen.
Shaping the Cookies
Uniformity in size is essential for even freezing and consistent texture. To shape your cookie discs, use a cookie scoop or your hands to form balls of dough that are approximately 1.5 inches in diameter. Lay them on a parchment-lined baking sheet, making sure to leave some space between each disc as they will spread slightly during freezing.
Once you have shaped all the discs, flatten each ball gently with your palm or the bottom of a glass to form neat, even discs. Aim for about ¼ inch thick. This thickness will ensure they freeze well and maintain a nice texture when served.
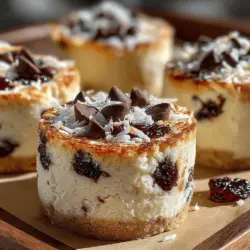
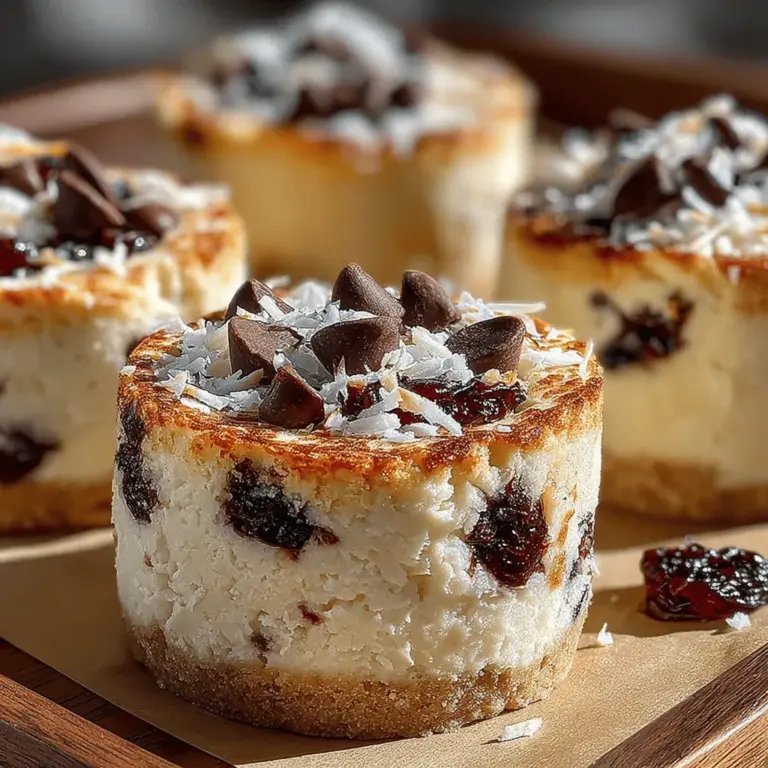
Adding Toppings
The beauty of these cookie discs lies in their versatility, especially when it comes to toppings. You can customize your frozen treats to suit your flavor preferences. Here are a few topping ideas:
– Chopped Nuts: Almonds, walnuts, or pecans add a delightful crunch and healthy fats.
– Coconut Flakes: Toasted or plain, they enhance the coconut flavor and provide additional texture.
– Dark Chocolate Chips: For a richer cookie, sprinkle some dark chocolate chips on top before freezing.
– Fresh Berries: Add a few blueberries or raspberries for a burst of freshness and antioxidants.
Feel free to experiment with combinations of these toppings, allowing each disc to reflect your personal taste and creativity.
Freezing the Cookies
Once your cookie discs are shaped and topped, it’s time to freeze them. Place the baking sheet in the freezer for approximately 2 hours, or until the discs are completely firm. After they’ve frozen solid, transfer the discs to an airtight container or a resealable freezer bag. This step is crucial for preserving their texture and flavor.
Label the container with the date, as these cookie discs can be stored in the freezer for up to three months. To serve, simply remove the desired number of discs from the freezer and let them sit at room temperature for a few minutes before enjoying.
Nutritional Information
Frozen Coconut Yogurt Cookie Discs are not only delicious but also nutritious. Each disc provides a healthy dose of macronutrients, making them a guilt-free treat.
Nutritional Breakdown (per disc, based on standard ingredients):
– Calories: 100-120
– Protein: 2-3g
– Carbohydrates: 15-18g
– Dietary Fiber: 1-2g
– Sugars: 5-7g
– Fats: 4-6g
Health Benefits
The primary ingredient, coconut yogurt, is rich in probiotics, promoting gut health. Additionally, the use of whole grain flours can provide essential nutrients and fiber, while natural sweeteners like maple syrup offer antioxidants. By opting for a low-sugar recipe, these cookie discs serve as a healthier dessert option without sacrificing flavor.
Serving Suggestions
Frozen Coconut Yogurt Cookie Discs are incredibly versatile and can be enjoyed in various ways:
– Post-Workout Snack: They make an excellent protein-packed recovery treat after a workout. The carbohydrates from the cookies replenish energy levels, while the yogurt provides protein for muscle repair.
– Dessert Alternative: Serve them alongside fresh fruit, such as sliced strawberries or mango, to create a refreshing dessert.
– Ice Cream Sandwich: For a fun twist, use two cookie discs to sandwich a scoop of your favorite dairy-free ice cream for a delightful treat.
– On-the-Go Snack: Pack them in lunchboxes for a healthy snack option that kids and adults alike will enjoy.
Creative Variations
To keep your baking exciting, consider trying these variations:
– Flavor Profiles: Experiment with different extracts like lemon or peppermint for a refreshing twist. You could also add spices like cinnamon or nutmeg for warmth.
– Dietary Adaptations: For a nut-free version, substitute almond flour with sunflower seed flour. To make it vegan, ensure you use plant-based yogurt and a vegan-friendly sweetener.
– Fruit-Infused: Incorporate mashed bananas or pureed mango into the wet mixture for added moisture and flavor.
Storage Tips
To maintain the freshness and quality of your Frozen Coconut Yogurt Cookie Discs, follow these storage tips:
– Airtight Container: Always store your cookies in an airtight container to prevent freezer burn.
– Layering: If stacking in a container, place parchment paper between layers to avoid sticking.
– Thawing: When you want to enjoy them, take out only what you need and return the rest to the freezer immediately to maintain their texture.
These cookie discs can last in the freezer for up to three months, making them a great make-ahead treat for any occasion.
Conclusion
Frozen Coconut Yogurt Cookie Discs are a delightful and healthy snack that can be enjoyed year-round. With their simplicity and versatility, they offer a nutritious alternative to traditional cookies, allowing you to indulge without the guilt. Experimenting with different toppings, flavors, and serving suggestions can make this recipe a staple in your kitchen. We encourage you to explore the joy of creating your own Frozen Coconut Yogurt Cookie Discs and revel in the deliciousness that awaits!