Key Lime Pie Bars are not just a dessert; they are a celebration of flavor and tradition wrapped in a convenient, handheld form. This delightful treat combines the tangy freshness of key limes with a luscious, creamy filling and a crunchy graham cracker crust, making it a perfect indulgence for any occasion. Whether you’re hosting a summer barbecue, enjoying a picnic, or simply craving a slice of citrusy goodness, Key Lime Pie Bars deliver a refreshing punch that will leave your taste buds dancing.
The appeal of these bars lies in their unique balance of sweet and tart flavors. The zesty key lime filling is complemented by the buttery, crunchy crust, creating a harmonious blend that is both satisfying and invigorating. This dessert is particularly beloved for its simplicity; it’s easy to make at home, allowing anyone to impress family and friends with minimal effort. With just a few key ingredients and straightforward steps, you can whip up a batch of these delightful bars that are sure to be the star of your dessert table.
The Allure of Key Lime Pie Bars
To appreciate the Key Lime Pie Bars fully, it’s essential to understand their roots. The original Key lime pie hails from the Florida Keys, where the small, tart key limes thrive in the tropical climate. This iconic dessert has been a staple in the region for generations, reflecting the local culture and culinary traditions. The combination of key lime juice, sweetened condensed milk, and egg yolks creates a creamy filling that is both rich and refreshing, capturing the essence of the sunny Florida landscape.
Key Lime Pie Bars offer a modern twist on this classic dessert, transforming it into a more accessible and portable format. By adapting the traditional pie recipe into bar form, these treats have gained immense popularity among dessert enthusiasts. They are perfect for summer gatherings, as they can be cut into squares or rectangles, making them easy to serve and share. Their vibrant color and zesty flavor make them an attractive addition to any dessert spread, especially during warm weather events.
Not only are these bars delicious, but they also embody the spirit of summer with their bright, zesty flavors. The refreshing taste of key limes is a welcome contrast to heavier desserts, providing a light and satisfying option for those looking to indulge without overwhelming their palate. From casual family dinners to celebratory occasions, Key Lime Pie Bars have become a beloved choice for dessert lovers everywhere.
Ingredient Breakdown
To make the perfect Key Lime Pie Bars, it’s crucial to use high-quality ingredients that contribute to the overall flavor and texture. Let’s dive into the components that make up this delectable dessert.
Crust Ingredients
The crust is the foundation of your Key Lime Pie Bars, providing a crunchy texture that contrasts beautifully with the creamy filling. Here are the key ingredients you’ll need:
– Graham Cracker Crumbs: The primary ingredient for the crust, graham cracker crumbs lend a sweet and slightly nutty flavor. They provide the perfect base for the bars while adding texture to each bite.
– Granulated Sugar: A touch of granulated sugar is added to the crust mixture to enhance the sweetness and balance the flavors. It helps to create a more cohesive crust that holds together well.
– Unsalted Butter: Melted unsalted butter is incorporated into the crust mixture, binding the graham cracker crumbs and sugar together. It adds richness and a buttery flavor that complements the overall dessert.
Filling Ingredients
The filling is where the magic happens, transforming simple ingredients into a creamy, tangy delight. Here’s what you’ll need for the filling:
– Sweetened Condensed Milk: This ingredient is a key player in the filling, providing a rich and creamy base. Its sweetness balances the tartness of the key lime juice, creating a harmonious flavor profile.
– Sour Cream: Adding sour cream to the filling is essential for achieving the perfect balance of flavors. It introduces a subtle tang that complements the sweetness of the condensed milk, preventing the filling from being overly sweet.
– Freshly Squeezed Key Lime Juice and Zest: For an authentic key lime flavor, freshly squeezed juice and lime zest are non-negotiable. The juice delivers the signature tartness, while the zest adds a burst of citrus aroma and flavor.
– Egg Yolks: Egg yolks are crucial for the filling’s richness and stability. They help to thicken the mixture, ensuring that the bars set properly while providing a velvety texture.
Topping Ingredients
The finishing touch to your Key Lime Pie Bars is the whipped cream topping. Here’s what you’ll need to create a light and airy layer:
– Heavy Whipping Cream: This ingredient is essential for achieving a fluffy and indulgent topping. It whips up beautifully, creating a light texture that contrasts nicely with the dense filling.
– Powdered Sugar: A bit of powdered sugar is added to the whipped cream for sweetness. It dissolves easily, ensuring a smooth topping that doesn’t overpower the flavors of the bars.
– Optional Garnishing with Lime Zest: For an extra pop of flavor and visual appeal, you can garnish the whipped cream topping with lime zest. It enhances the overall presentation and adds a final touch of citrus brightness.
Step-by-Step Instructions
Now that you have a clear understanding of the ingredients needed to make these delightful Key Lime Pie Bars, let’s delve into the step-by-step instructions for preparing the crust. Follow these detailed guidelines to ensure your crust comes out perfectly every time.
Preparing the Crust
1. Preheat the Oven: Start by preheating your oven to 350°F (175°C). This ensures that your crust will bake evenly and develop a nice golden color.
2. Combine Crust Ingredients: In a medium mixing bowl, combine 1 ½ cups of graham cracker crumbs, ¼ cup of granulated sugar, and ½ cup of melted unsalted butter. Use a fork or a spatula to mix the ingredients until they resemble wet sand. The mixture should hold together when pressed but not be overly sticky.
3. Press the Mixture into the Pan: Line an 8×8-inch baking dish with parchment paper, allowing some overhang for easy removal later. Transfer the crumb mixture into the prepared baking dish and use the back of a measuring cup or your fingers to press it firmly into an even layer across the bottom. Ensure that the crust is compact and even for optimal texture.
4. Bake the Crust: Place the baking dish in the preheated oven and bake for 10 minutes, or until the crust is lightly golden and fragrant. Keep an eye on it to avoid over-baking, as a perfectly baked crust will provide a lovely crunch without being too hard.
5. Cool the Crust: Once baked, remove the crust from the oven and allow it to cool slightly while you prepare the filling. This brief cooling period helps to set the crust before adding the creamy key lime filling.
With the crust prepared, you are one step closer to indulging in these zesty Key Lime Pie Bars. Stay tuned for the next part, where we will explore how to create the luscious filling and the finishing touches that make this dessert truly unforgettable.
Tips for Pressing the Crust Evenly into the Baking Pan
Achieving a perfectly pressed crust is crucial for your Zesty Key Lime Pie Bars as it provides a solid foundation for the creamy filling. Here are some helpful tips to ensure your crust is evenly distributed across the baking pan:
1. Use the Right Tools: A flat-bottomed measuring cup or a glass can work wonders for pressing the crust. The flat surface allows you to apply even pressure, ensuring that the crust adheres well to the bottom and sides of the pan.
2. Start from the Center: Begin pressing the crust mixture in the center of the pan and work your way outwards. This technique helps distribute the crust evenly and prevents it from being too thick in some areas and too thin in others.
3. Don’t Rush: Take your time to press the crust mixture firmly and evenly. It’s better to spend an extra minute to ensure that the crust is compact and smooth, which will result in a better texture once baked.
4. Use Parchment Paper: If you want to make removing the bars easier, consider lining the baking pan with parchment paper, allowing some overhang for easy lifting once your bars are set.
5. Chill Before Baking: After pressing the crust into the pan, place it in the refrigerator for about 15-30 minutes before baking. This helps the crust set and will prevent it from shrinking during baking.
Making the Filling
Creating a smooth and zesty filling is the heart of your Key Lime Pie Bars. Here’s a step-by-step guide:
1. Gather the Ingredients: For the filling, you will need sweetened condensed milk, egg yolks, freshly squeezed key lime juice (or regular lime juice if key limes are unavailable), and lime zest. Having everything measured and ready will streamline the process.
2. Combine Ingredients: In a medium mixing bowl, start by whisking the egg yolks until they are light in color. This step is essential as it incorporates air into the mixture, contributing to a light and fluffy texture.
3. Incorporate Sweetened Condensed Milk: Gradually add the sweetened condensed milk into the whisked egg yolks, continuing to whisk until the mixture is smooth and well-combined. This is where the richness of your filling will come from.
4. Add Lime Juice and Zest: Next, pour in the freshly squeezed lime juice and mix thoroughly. The acidity from the lime juice will balance the sweetness of the condensed milk while adding that signature zesty flavor. Finally, fold in the lime zest for an extra citrus punch.
5. Mixing for Smooth Texture: Ensure that the filling is mixed well, but avoid overmixing which can introduce air bubbles. The goal is to have a velvety smooth texture that will bake evenly.
Combining and Baking
Now that you have your crust and filling ready, it’s time to bring everything together and bake.
1. Pour the Filling Over the Crust: Carefully pour the lime filling over the pre-baked crust, using a spatula to spread it evenly. Ensure the filling reaches all corners of the pan for even baking.
2. Bake to Perfection: Preheat your oven to 350°F (175°C) and bake the bars for about 20-25 minutes. The filling should be set but still have a slight jiggle in the center when you gently shake the pan. This indicates that it will firm up as it cools.
3. Determine Doneness: To check if the filling is perfectly set, insert a toothpick into the center. It should come out clean or with just a few moist crumbs, but not wet batter. This method ensures the filling is baked just right without being overcooked.
Chilling and Serving
Once baked, the bars need time to chill and set properly.
1. Cool Before Refrigerating: Allow the bars to cool at room temperature for about 30 minutes before transferring them to the refrigerator. This step helps prevent condensation from forming on top of the bars.
2. Refrigeration Time: Chill the bars for at least 3 hours, or overnight if possible. This resting period allows the flavors to meld and the texture to firm up, making slicing easier.
3. Preparing the Topping: For a delightful finishing touch, whip up some heavy cream with a bit of powdered sugar and vanilla extract until stiff peaks form. This creamy topping complements the tartness of the lime filling beautifully.
Presentation and Serving Suggestions
Presentation plays a significant role in how your dessert is perceived, so consider these ideas for serving your Key Lime Pie Bars:
1. Cutting Cleanly: Use a sharp knife to slice the bars into even squares or rectangles. For cleaner cuts, wipe the knife with a damp cloth between slices.
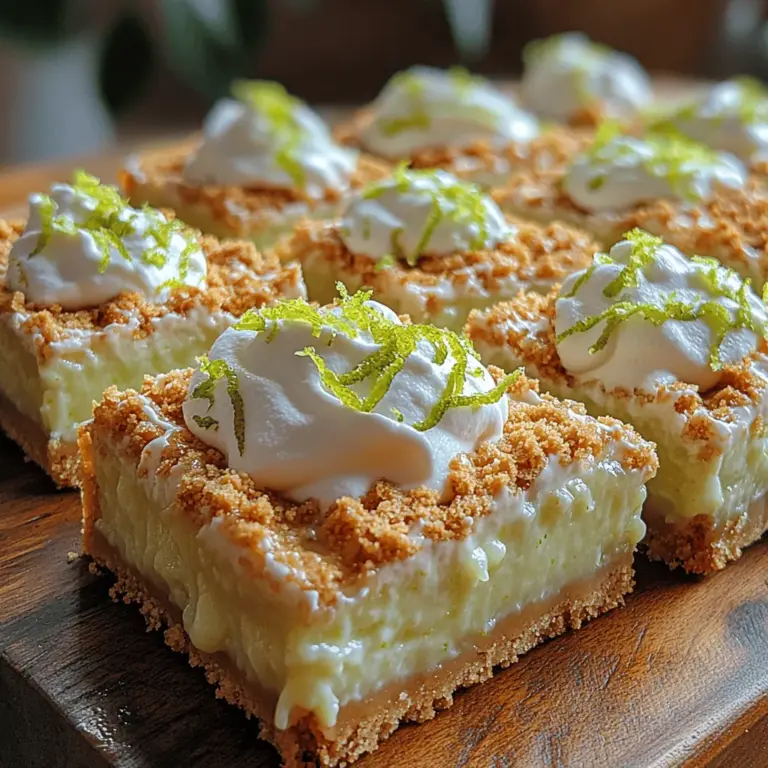
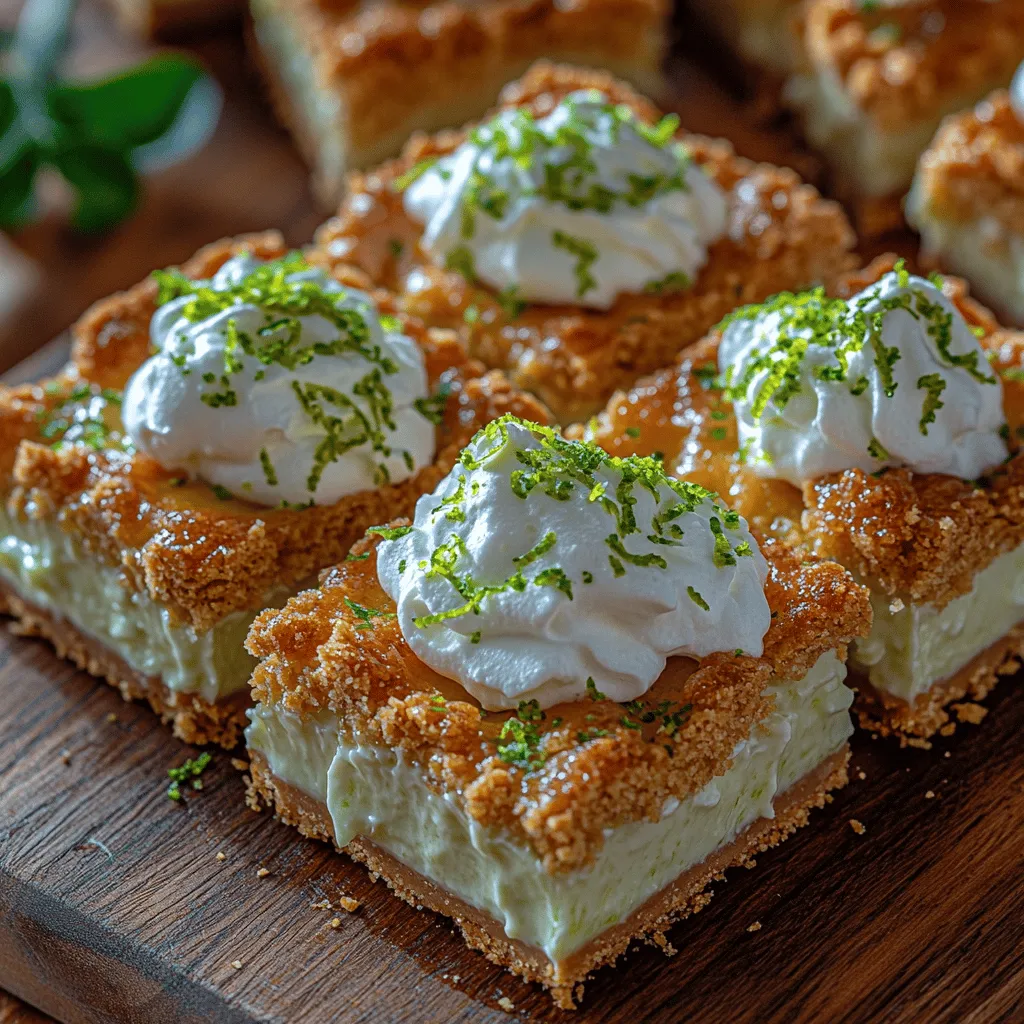
2. Garnishing: Enhance the visual appeal by garnishing each bar with a dollop of whipped cream on top, a sprinkle of lime zest, and a thin slice of lime. This not only looks beautiful but adds an extra layer of flavor.
3. Serve Chilled: These bars are best served chilled, making them the perfect refreshing dessert for warm weather gatherings or summer parties. Arrange them on a platter, and serve with additional lime wedges for an extra zesty kick.
Variations and Customizations
Feel free to get creative with your Key Lime Pie Bars! Here are some variations and customizations to consider:
1. Alternative Crust Options: For those with dietary restrictions, consider using gluten-free graham crackers or almond flour to create a gluten-free crust. You can also try a crust made from crushed nuts or oats for a different texture.
2. Flavor Variations: While key lime juice is traditional, you can experiment with other citrus fruits such as blood oranges, lemons, or even a combination of citrus juices. Coconut milk can also be added for a tropical twist.
3. Different Toppings: Beyond whipped cream, consider topping your bars with toasted coconut flakes, fresh berries, or a drizzle of chocolate sauce for added richness. Each of these options will bring a unique twist to the classic recipe.
Nutritional Information
Understanding the nutritional content of your dessert can help balance indulgence with enjoyment. Here’s a general overview of the nutritional information per serving of Zesty Key Lime Pie Bars:
– Calories: Approximately 250-300 calories per bar (depending on portion size)
– Fat: 15g (mostly from the crust and whipped cream)
– Carbohydrates: 30g
– Protein: 3g
– Sugar: 20g (from sweetened condensed milk and added sugar)
This dessert strikes a balance between rich flavors and satisfying sweetness, making it a delightful treat without overindulgence.
Conclusion
Zesty Key Lime Pie Bars are a refreshing and delicious dessert that encapsulates the bright flavors of lime in a creamy, easy-to-make treat. Perfect for any occasion, from summer barbecues to elegant dinner parties, these bars offer a delightful combination of sweet and tart that will impress your guests.
Encouraging you to try this recipe for yourself, you will discover just how simple it is to create a dessert that’s not only visually appealing but also bursting with flavor. Serve these bars chilled for an unforgettable dessert experience, and watch as they become a favorite among family and friends. Their versatility makes them a great addition to any gathering, ensuring a refreshing end to the meal. Enjoy the delightful flavors of Zesty Key Lime Pie Bars, and share them with the ones you love!
