Introduction
Cheesecake bars are a delightful twist on the classic cheesecake, offering all the creamy indulgence in a convenient, portable form. Their rich texture and luscious flavor make them a favorite dessert for gatherings, potlucks, or simply as a sweet treat to enjoy at home. Among the myriad of flavors available, Biscoff Bliss Cheesecake Bars stand out as a unique and mouthwatering option that combines the rich, caramelized taste of Biscoff cookies and spread with a smooth, creamy cheesecake filling.
Biscoff cookies, known for their spiced flavor and delightful crunch, elevate these cheesecake bars to a new level of deliciousness. The addition of Biscoff spread—an irresistible creamy spread made from crushed Biscoff cookies—infuses the cheesecake filling with its signature flavor, creating a dessert that is both decadent and comforting. As dessert trends continue to lean towards no-bake options, these Biscoff Bliss Cheesecake Bars fit seamlessly into the movement, offering an easy-to-make treat that doesn’t require hours in the kitchen.
In this recipe, we will guide you through the process of creating these delectable cheesecake bars, from selecting the right ingredients to crafting the perfect texture. Whether you are a seasoned baker or a novice in the kitchen, the approachable nature of this recipe will have you whipping up a batch of these bars in no time. Get ready to impress your family and friends with this stunning dessert that is sure to be the star of any gathering.
Understanding the Ingredients
To create the perfect Biscoff Bliss Cheesecake Bars, it’s essential to understand the key ingredients that contribute to their delicious flavor and texture. Let’s break down each component:
Biscoff Cookie Crumbs
Biscoff cookie crumbs are the foundation of the crust for these cheesecake bars. Made from the beloved caramelized spiced cookies, these crumbs provide a unique flavor profile that complements the cheesecake filling beautifully. They are an ideal choice for crusts due to their fine texture and rich taste, which adds both sweetness and a hint of spice. You can find Biscoff cookie crumbs pre-packaged in stores or simply crush whole Biscoff cookies in a food processor to achieve the right consistency.
Unsalted Butter
Unsalted butter plays a crucial role in creating a rich, flavorful crust. It binds the cookie crumbs together while contributing to the overall texture of the crust. Using unsalted butter allows for better control over the saltiness of the dessert, ensuring that the sweet flavors of the cheesecake are not overshadowed.
Cream Cheese
Cream cheese is the star ingredient of the cheesecake filling, providing its signature creamy texture. For the best results, it is essential to use softened cream cheese, as this will ensure a smooth mixture that blends seamlessly with the other ingredients. Softening the cream cheese allows for easier mixing, preventing lumps and creating that velvety consistency we all love.
Sugars (Granulated and Brown)
Both granulated and brown sugars are used in this recipe to create a perfect balance of sweetness. Granulated sugar contributes a clean sweetness, while brown sugar adds depth and a hint of caramel flavor. The combination of these sugars elevates the overall taste of the cheesecake, enhancing its richness and complexity.
Vanilla Extract
Vanilla extract is a classic flavor enhancer that adds a subtle warmth to the cheesecake filling. A splash of pure vanilla extract can elevate your dessert, rounding out the flavors and making the cheesecake even more indulgent. Always opt for pure vanilla extract for the best taste; imitation vanilla may not provide the same depth of flavor.
Eggs
Eggs serve as a vital structural component of the cheesecake filling. They help the filling set properly, ensuring that the bars hold their shape once cooled. It’s important to use eggs at room temperature to mix evenly into the batter, leading to a smoother filling.
Biscoff Spread
Biscoff spread is the pièce de résistance of this recipe. Its creamy consistency and unique flavor infuse the cheesecake filling with the essence of Biscoff cookies. This spread not only provides added sweetness but also enhances the overall flavor profile of the dessert, making it truly irresistible.
Optional Toppings (Whipped Cream and Extra Cookies)
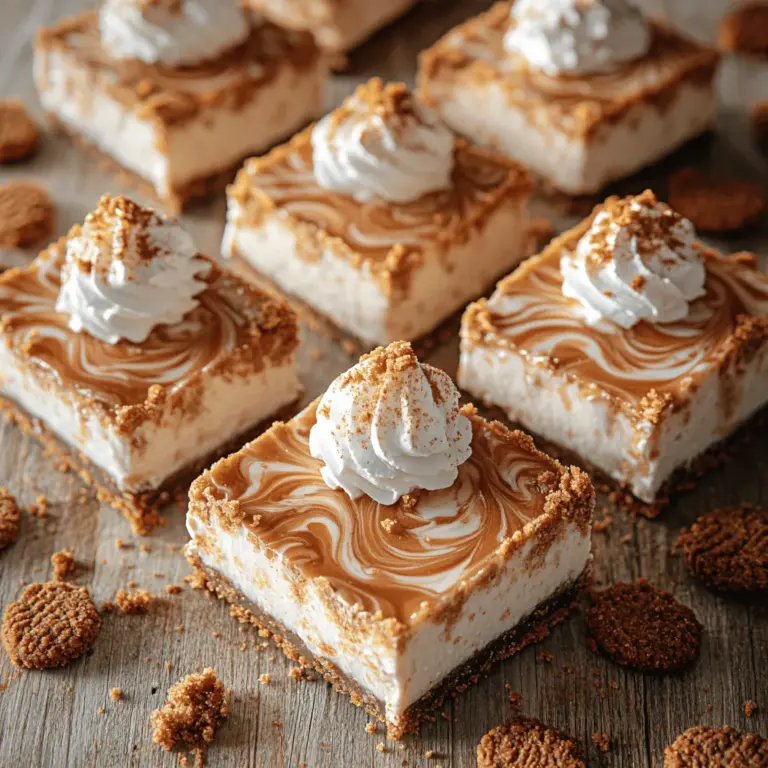
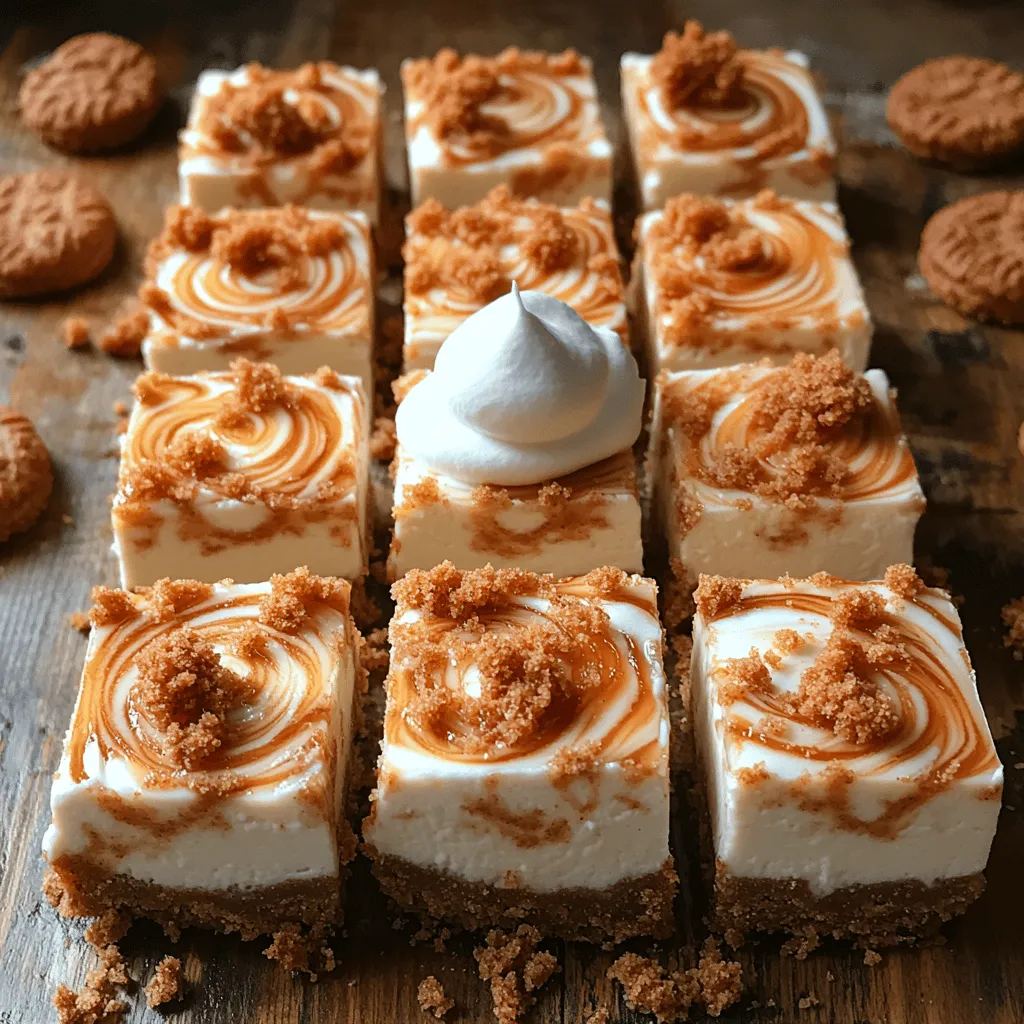
To take your Biscoff Bliss Cheesecake Bars to the next level, consider adding optional toppings such as whipped cream and extra Biscoff cookies for garnish. A dollop of whipped cream adds a light and fluffy texture that contrasts beautifully with the dense cheesecake bars, while crumbled cookies on top offer an appealing crunch and a visual element that makes the dessert even more enticing.
Step-by-Step Process to Create Biscoff Bliss Cheesecake Bars
Now that you have a solid understanding of the key ingredients, let’s dive into the step-by-step process of creating these delectable Biscoff Bliss Cheesecake Bars.
Preheating the Oven and Preparing the Baking Pan
The first step in crafting your cheesecake bars is preheating your oven. Set it to 350°F (175°C) to ensure it reaches the proper temperature for baking. While the oven is heating, prepare your baking pan. Line an 8×8-inch square baking pan with parchment paper, allowing some overhang on the sides. This will make it easier to lift the cheesecake bars out of the pan once they are set.
To ensure that the crust cooks evenly and does not stick, lightly grease the parchment paper with non-stick cooking spray or a thin layer of butter. Proper preparation of your pan is essential for achieving beautifully shaped bars that come out cleanly.
Crafting the Perfect Cookie Crust
With the oven preheated and the baking pan prepared, it’s time to craft the cookie crust. In a medium mixing bowl, combine 1 ½ cups of Biscoff cookie crumbs with ½ cup of melted unsalted butter. Use a fork or spatula to mix the crumbs and butter until they are well combined and resemble wet sand.
The right texture for your crust is crucial; it should hold together when pressed but not be overly wet. If the mixture seems too dry, you can add a little more melted butter, one tablespoon at a time, until it reaches the desired consistency. Once you have the perfect mixture, pour it into your prepared baking pan and press it down firmly with the back of a measuring cup or your hands to create an even layer. Aim for a thickness of about ½ inch to provide a sturdy base that holds up to the creamy cheesecake filling.
Whipping Up the Cheesecake Filling
Next, it’s time to make the cheesecake filling. In a large mixing bowl, add 16 ounces of softened cream cheese and beat it with an electric mixer on medium speed until it becomes smooth and creamy. This step is crucial; taking the time to thoroughly beat the cream cheese will ensure that your filling is free from lumps and has a velvety texture.
Once the cream cheese is smooth, gradually add in ½ cup of granulated sugar and ½ cup of brown sugar, mixing until well incorporated. The combination of sugars will provide a balanced sweetness that complements the Biscoff flavors.
After the sugars are mixed in, add 1 teaspoon of vanilla extract and 2 large eggs, one at a time, ensuring each egg is fully incorporated before adding the next. Mix on low speed just until combined to avoid overbeating, which can introduce too much air into the filling and lead to cracks during baking.
Finally, fold in 1 cup of Biscoff spread until fully incorporated. The creamy consistency of the spread will enhance the richness of the cheesecake filling while infusing it with that distinct Biscoff flavor.
With the cheesecake filling ready, it’s time to pour it over the prepared crust in the baking pan, spreading it evenly with a spatula. This layer of creamy goodness is the heart of your Biscoff Bliss Cheesecake Bars.
Stay tuned for the next steps in this recipe, where we will cover the baking process, cooling, and essential tips to ensure your cheesecake bars turn out perfectly.
Importance of Scraping the Bowl to Ensure Even Mixing
When preparing your Biscoff Bliss Cheesecake Bars, one essential step is to scrape down the sides of your mixing bowl. This simple action ensures that all ingredients are well incorporated, promoting an even texture and flavor throughout the cheesecake mixture. As you mix, ingredients can cling to the bowl’s sides and bottom, which can lead to uneven mixing. By taking a few extra moments to scrape the bowl with a spatula, you can ensure that the creamy Biscoff spread, cream cheese, and sugar blend seamlessly, resulting in the smooth and luscious texture that defines these cheesecake bars.
Adding Flavor and Structure
With your mixing bowl prepped and ingredients at the ready, it’s time to incorporate the eggs and vanilla extract. The key to a rich and flavorful cheesecake lies in these two components.
Step-by-Step Guidance on Incorporating Eggs and Vanilla Extract Seamlessly
1. Add the Eggs: Crack two large eggs into a small bowl to check for any shell fragments before adding them to the mixing bowl. This method not only prevents bits of shell from getting into your cheesecake mixture but also allows you to quickly incorporate the eggs without any fuss.
2. Blend in the Vanilla Extract: Pour in one teaspoon of pure vanilla extract. This classic ingredient enhances the flavor profile of your cheesecake bars, adding a hint of warmth and depth that pairs beautifully with the spiced notes of Biscoff.
3. Mix Gently: With your mixer set to low speed, mix the eggs and vanilla extract into the cream cheese mixture until just combined. Avoid overmixing, as this can incorporate too much air, leading to cracks in your cheesecake bars as they bake.
Explanation of Folding Biscoff Spread into the Mixture to Maintain Creaminess
Now comes the moment to fold in the star of the show—Biscoff spread. This step requires a gentle touch to ensure the creamy texture remains intact:
1. Add the Biscoff Spread: Scoop in about ½ cup of Biscoff spread. Using a spatula, gently fold the spread into the cheesecake mixture. Employ a figure-eight motion, lifting from the bottom and folding over the top. This technique helps to maintain the airy texture while evenly spreading the Biscoff flavor throughout.
2. Avoid Overmixing: Be cautious not to overmix at this stage. The goal is to achieve a marbled effect, where you can still see swirls of Biscoff spread throughout the mixture. This not only adds a beautiful visual element but also enhances the flavor in every bite.
Baking to Perfection
Baking your cheesecake bars is where the magic happens. The right baking technique is crucial for achieving that creamy, smooth texture you desire.
How to Determine the Right Doneness of Cheesecake Bars
1. Visual Cues: As your cheesecake bars bake, keep an eye on them. They should puff slightly and the edges will appear set while the center may still have a slight jiggle. This is perfectly normal, as the cheesecake will continue to firm up while cooling.
2. Toothpick Test: If you’re unsure, perform a toothpick test by inserting a toothpick into the center of the bars. It should come out clean but with a few moist crumbs clinging to it, indicating that the bars are done without being overbaked.
Advice on Avoiding Overbaking to Keep the Texture Creamy and Smooth
One of the most common mistakes in baking cheesecake is overbaking, which can lead to a dry texture. To avoid this, check your bars a few minutes before the suggested baking time. Remember, cheesecakes continue to cook as they cool, so it’s better to err on the side of underbaking slightly.
Cooling and Chilling: The Key to the Best Texture
After baking, the cooling process is integral to achieving the perfect texture for your cheesecake bars.
Importance of Cooling at Room Temperature Before Refrigerating
Once your Biscoff Bliss Cheesecake Bars are out of the oven, allow them to cool in the pan at room temperature for at least one hour. This gradual cooling process helps to prevent cracking and ensures the bars set properly.
Recommended Chilling Time for Optimal Flavor and Texture
After they have cooled, cover the pan with plastic wrap and place it in the refrigerator. It’s best to chill the cheesecake bars for at least 4 hours, but overnight is even better. This extended chilling time allows the flavors to meld beautifully, resulting in a richer taste and a firmer texture that makes cutting and serving easier.
Presentation and Serving Suggestions
Now that your Biscoff Bliss Cheesecake Bars are perfectly set, it’s time to present them in a way that makes them as delightful to look at as they are to eat.
Techniques for Removing and Cutting the Bars
1. Using Parchment Overhang for Easy Removal: If you lined your baking pan with parchment paper, you could easily lift the entire cheesecake out of the pan using the overhanging edges. This method prevents any sticking and makes for a cleaner cut.
2. Cutting the Bars: Use a sharp knife to slice the cheesecake into squares or rectangles. For cleaner cuts, dip the knife in hot water and wipe it dry between each cut. This technique prevents the creamy filling from sticking to the knife, resulting in neat, beautiful edges.
Creative Serving Ideas
1. Garnishing: Enhance the presentation by topping each bar with a dollop of whipped cream and a sprinkle of crushed Biscoff cookies. You can also drizzle some extra Biscoff spread over the top for added flavor and visual appeal.
2. Pairing with Beverages or Other Desserts: These cheesecake bars pair wonderfully with a hot cup of coffee or tea, as the spices in the Biscoff complement the richness of the cheesecake. Alternatively, consider serving them alongside a scoop of vanilla ice cream for an indulgent dessert experience.
Nutritional Information
Understanding the nutritional aspects of your Biscoff Bliss Cheesecake Bars can help you enjoy them mindfully.
Overview of Nutritional Aspects of the Cheesecake Bars
Each bar is a delightful balance of creamy indulgence and satisfying flavor. A standard serving size (one bar) contains approximately:
– Calories: 250-300 calories per bar
– Fat: 18-20 grams
– Carbohydrates: 25-30 grams
– Protein: 4-6 grams
Discussion on Serving Size and Calorie Count Per Bar
While these bars are rich, they are also incredibly satisfying. You might find that one bar is enough to satisfy your sweet tooth, making it a perfect treat for any occasion. Enjoy them in moderation, and don’t hesitate to share with friends and family!
Conclusion
In conclusion, making Biscoff Bliss Cheesecake Bars is not just about following a recipe; it’s about experiencing the joy of baking and creating something delicious that you can share with loved ones. From the smooth blending of ingredients to the careful baking and chilling process, every step brings you closer to a delightful dessert that is sure to impress.
Embrace your creativity in the kitchen as you experiment with this easy-to-follow recipe. Whether you stick to the classic version or add your twist, these cheesecake bars are bound to become a favorite. We encourage you to share your experiences and any variations you try—fostering a sense of community around baking and bringing joy to our kitchens. Enjoy your Biscoff Bliss Cheesecake Bars, and happy baking!
