Introduction
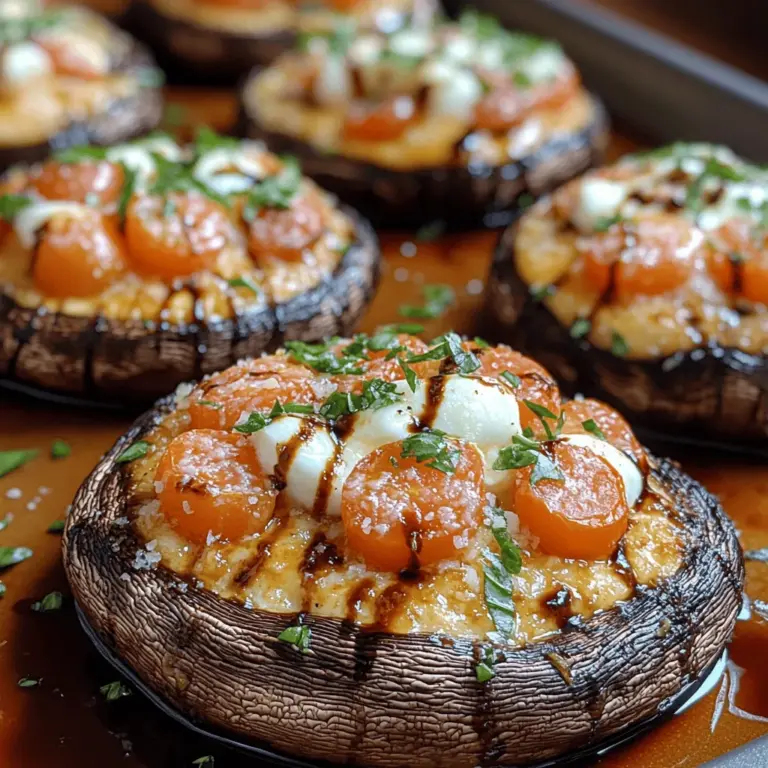
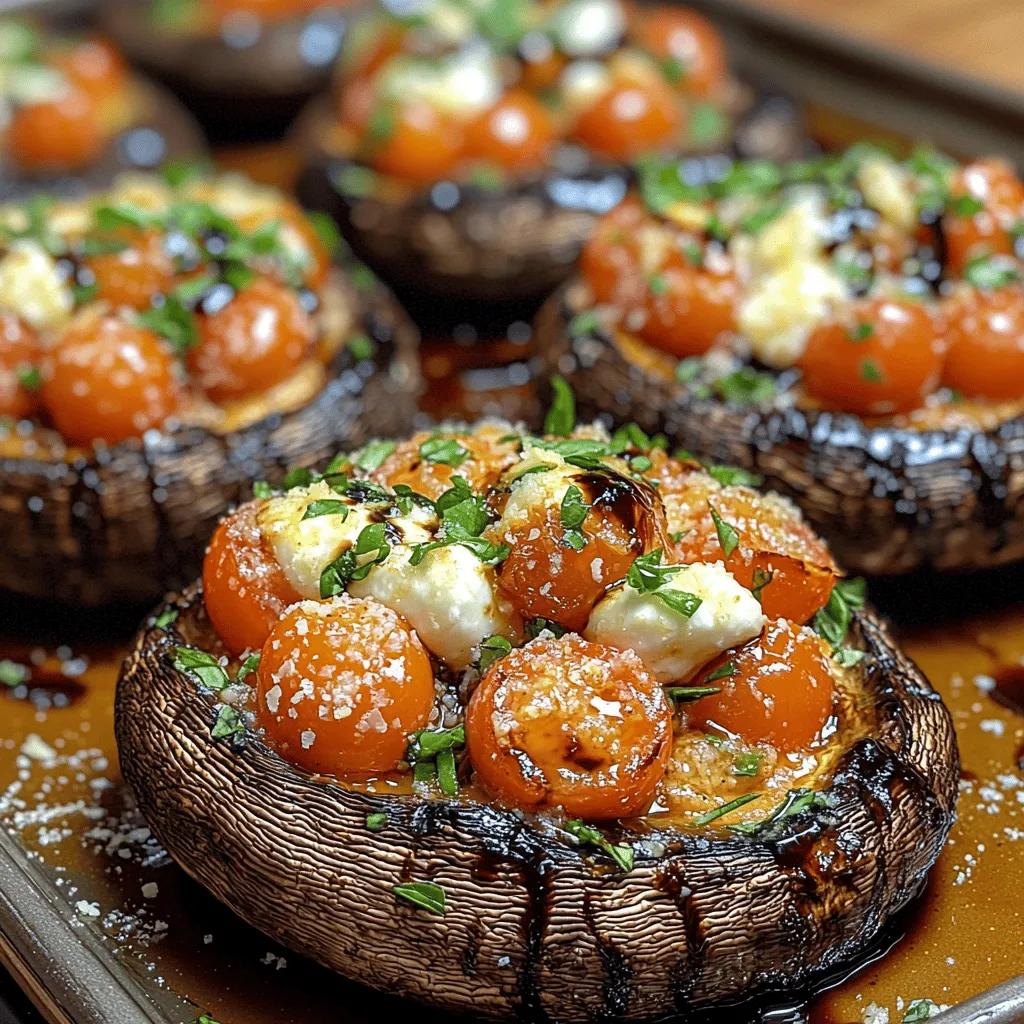
Homemade meals have a unique charm that brings comfort and joy to our lives. Among the myriad of culinary delights, few dishes embody the essence of fresh, vibrant ingredients quite like the Caprese Delight Portobello Melts. This dish marries the meaty texture of portobello mushrooms with the classic flavors of a Caprese salad, creating a melt that is both satisfying and nourishing. Whether you’re looking for a delightful lunch option, a quick weeknight dinner, or even a show-stopping appetizer for a gathering, these portobello melts will not disappoint.
The Caprese salad, originating from the island of Capri in Italy, is known for its simple yet elegant combination of fresh mozzarella, ripe tomatoes, and fragrant basil, drizzled with olive oil and balsamic vinegar. Our Caprese Delight Portobello Melts takes this traditional salad and transforms it into a hearty, baked delight. The portobello mushrooms serve as the perfect base, offering a robust flavor that complements the creamy mozzarella and the bright acidity of the tomatoes.
What makes this recipe stand out is not just its impressive taste but also its versatility and ease of preparation. It caters to various dietary preferences, allowing everyone to enjoy a delicious meal without the fuss. The combination of fresh ingredients and straightforward cooking techniques means that even novice cooks can whip up this dish with confidence. Let’s dive deeper into the ingredients and preparation steps that will lead you to create this culinary masterpiece.
Ingredients Overview
To craft the perfect Caprese Delight Portobello Melts, you’ll need a selection of essential ingredients, each playing a vital role in delivering the dish’s rich flavors.
Essential Ingredients for Caprese Delight Portobello Melts
1. Portobello Mushrooms: The star of this dish, portobello mushrooms provide a meaty texture and earthy flavor that enhances the overall experience. Look for firm, fresh mushrooms with a smooth cap for the best results.
2. Fresh Mozzarella Cheese: Known for its creamy texture and mild flavor, fresh mozzarella is a crucial component of the Caprese flavor profile. Make sure to use high-quality mozzarella for optimal melting and taste.
3. Tomatoes: Ripe, juicy tomatoes add freshness and acidity to balance the richness of the cheese and mushrooms. Heirloom or vine-ripened tomatoes are excellent choices for their robust flavor.
4. Fresh Basil: A handful of fresh basil leaves adds a fragrant herbal note to the dish, enhancing the overall taste and giving it that classic Caprese flair.
5. Balsamic Glaze: Drizzling balsamic glaze adds a sweet and tangy finish that ties all the flavors together. You can either buy pre-made glaze or make your own by reducing balsamic vinegar.
6. Olive Oil: A drizzle of good-quality olive oil will enrich the flavors and add a touch of luxury to the dish.
7. Salt and Pepper: Essential for seasoning, these ingredients elevate the taste and bring out the natural flavors of the mushrooms and tomatoes.
Preparing Your Kitchen and Tools
Before diving into the recipe, it’s essential to prepare your kitchen and gather the necessary tools to make the cooking process smooth and enjoyable.
– Baking Sheet: A sturdy baking sheet will be your best friend for this recipe, as it’s where the mushrooms will roast to perfection.
– Parchment Paper or Cooking Spray: Line your baking sheet with parchment paper or coat it with cooking spray to prevent sticking and ensure easy cleanup.
– Mixing Bowls: You’ll need a couple of mixing bowls to combine ingredients and prepare your toppings.
– Sharp Knife and Cutting Board: A sharp knife will help you slice the tomatoes and mushrooms with ease, while a cutting board provides a safe workspace.
– Measuring Cups and Spoons: Accurate measurements are crucial for achieving the best flavor combination in your dish.
Importance of Preheating the Oven
Preheating your oven is a critical step in baking and roasting. It ensures that your food cooks evenly and at the right temperature from the start. For the Caprese Delight Portobello Melts, preheat your oven to 375°F (190°C) to prepare for roasting the mushrooms and melting the cheese.
Step-by-Step Instructions for Preparing Caprese Delight Portobello Melts
Step 1: Clean the Portobello Mushrooms
Begin by gently wiping the portobello mushrooms with a damp cloth to remove any dirt. Avoid rinsing them under water, as mushrooms can absorb moisture, which may lead to a soggy texture when cooked.
Step 2: Prepare the Mushrooms
Remove the stems from the portobello mushrooms and, if desired, gently scrape out the gills using a spoon. This step is optional, but removing the gills will create more space for toppings and prevent the dish from becoming too earthy.
Step 3: Season the Mushrooms
Place the cleaned mushrooms on your prepared baking sheet, gill side up. Drizzle a little olive oil over each mushroom and season with salt and pepper. This simple seasoning enhances the natural flavor of the mushrooms and sets the stage for the other ingredients.
Step 4: Layer the Toppings
Now comes the fun part—layering the toppings! Start by placing slices of fresh tomato on top of each mushroom. Follow with thick slices of fresh mozzarella cheese. For an extra touch, you can add a few fresh basil leaves on top of the cheese.
Step 5: Bake the Mushrooms
Once your mushrooms are prepared and topped, place the baking sheet in the preheated oven. Bake for approximately 20-25 minutes, or until the mushrooms are tender and the cheese is melted and bubbly. Keep an eye on them to ensure they don’t overcook.
Step 6: Drizzle with Balsamic Glaze
When the Caprese Delight Portobello Melts are done baking, remove them from the oven and let them cool for a minute. Then, drizzle the balsamic glaze over the top of each mushroom. This finishing touch will add a beautiful glossy sheen and a burst of flavor.
Step 7: Garnish and Serve
Finally, garnish with additional fresh basil leaves for a pop of color and freshness. Serve the melts warm, alongside a simple green salad or some crusty bread for a complete and satisfying meal.
Baking Process
As you bake the Caprese Delight Portobello Melts, it’s important to understand how the baking process affects the final outcome. The combination of roasting the mushrooms and melting the cheese creates a delightful texture contrast that is both satisfying and delicious.
The Importance of Chilling the Dough
Though chilling isn’t part of the Caprese Delight Portobello Melts preparation, it’s worth noting for other recipes. Chilling dough before baking can significantly affect the texture and flavor of baked goods, allowing the ingredients to meld together harmoniously. For our mushroom melts, however, the focus is on the immediate roasting process.
Recommended Baking Time and Temperature
As mentioned, bake the portobello melts at 375°F (190°C) for 20-25 minutes. This temperature is ideal for achieving the perfect balance between cooking the mushrooms thoroughly while ensuring the cheese melts beautifully without burning.
Tips for Checking Doneness
To check if your Caprese Delight Portobello Melts are done, look for the following signs:
– The mushrooms should be fork-tender but not mushy.
– The cheese should be melted, bubbly, and slightly golden around the edges.
– The tomatoes should be soft but still retain their shape.
By keeping these indicators in mind, you can ensure that your melts come out perfectly every time.
Cooling and Storing Caprese Delight Portobello Melts
Once you’ve enjoyed your Caprese Delight Portobello Melts, you may have leftovers (if you’re lucky!). Allow any remaining melts to cool completely before transferring them to an airtight container. They can be stored in the refrigerator for up to three days. To reheat, simply place them back in the oven at a low temperature or microwave them until warmed through.
By following these detailed instructions and tips, you’ll create a delicious and visually appealing dish that showcases the flavors of a classic Caprese salad in a new and exciting way. So roll up your sleeves and get ready to enjoy the delightful experience of making Caprese Delight Portobello Melts!
The Best Way to Cool Cookies
Cooling cookies properly is essential to achieving the perfect texture and flavor. The right cooling method can help prevent sogginess and maintain that ideal chewy or crispy bite that everyone loves.
Using Wire Racks vs. Baking Sheets
When it comes to cooling your cookies, wire racks are your best friend. They allow for airflow around the cookies, preventing steam from getting trapped underneath, which can lead to a soft or soggy bottom.
1. Wire Racks: After removing your cookies from the oven, transfer them to a wire rack. This method will help them cool evenly and maintain their crispness.
2. Baking Sheets: If you don’t have wire racks, you can leave the cookies on the baking sheets, but it’s best to move them to a cool surface after a few minutes. This will help them set without becoming too soft.
How to Store Chocolate Chip Cookies
Storing your chocolate chip cookies correctly is vital to keeping them fresh and delicious. Here are some tips on how to store them effectively.
Best Practices for Freshness
1. Room Temperature: Store cookies in an airtight container at room temperature. This will keep them soft for several days. If you prefer your cookies chewy, adding a slice of bread to the container can help retain moisture.
2. Refrigeration: While it’s not typically necessary, you can refrigerate cookies to extend their freshness. Just be sure to wrap them tightly to prevent them from drying out or absorbing odors from the fridge.
Freezing for Long-Term Storage
If you want to save cookies for later enjoyment, freezing is an excellent option.
1. Freezing Baked Cookies: Once your cookies have cooled completely, place them in a single layer in a freezer-safe bag or container. Separate layers with parchment paper to prevent sticking. They can last in the freezer for up to three months.
2. Freezing Cookie Dough: You can also freeze cookie dough. Scoop balls of dough onto a baking sheet lined with parchment, freeze until solid, then transfer to a freezer bag. When you’re ready to bake, you can bake from frozen, adding a few extra minutes to the baking time.
Variations of the Classic Recipe
While the classic chocolate chip cookie is a beloved treat, there are numerous variations to explore that cater to different dietary preferences and taste preferences.
Gluten-Free Chocolate Chip Cookies
Creating gluten-free chocolate chip cookies is easier than it might seem. Here are some tips to ensure they turn out just as delicious.
1. Recommended Flour Substitutes: Use a gluten-free all-purpose flour blend that includes xanthan gum, which helps to bind the ingredients together. Almond flour or coconut flour can also be great options, but make sure to follow a specific gluten-free recipe to maintain the right texture.
2. Adjusting Baking Time and Temperature: Gluten-free cookies may require slight adjustments in baking time. Keep a close eye on them, as they can bake faster than traditional cookies.
Vegan Chocolate Chip Cookies
For those following a vegan diet, you can still enjoy delectable chocolate chip cookies with a few simple ingredient swaps.
1. Egg Replacements and Vegan Butter Options: Replace eggs with flaxseed meal mixed with water, applesauce, or a commercial egg replacer. Use vegan butter or coconut oil in place of regular butter.
2. Adjusting Consistency for Vegan Ingredients: Vegan ingredients can behave differently, so you may need to adjust the amount of flour or baking soda. Start with less flour and add until you achieve the desired dough consistency.
Creative Additions
Experimenting with different mix-ins can elevate your cookies to new heights.
1. Sea Salt Flakes, Nuts, or Dried Fruit: Adding a sprinkle of sea salt on top before baking enhances flavor. Chopped nuts, like walnuts or pecans, add crunch, while dried fruits like cranberries or raisins can introduce a delightful chewiness.
2. Flavor Enhancements: Coffee, Cinnamon, or Peanut Butter: For an extra flavor dimension, consider adding a teaspoon of instant espresso powder, a dash of cinnamon, or incorporating peanut butter into the dough for a rich, nutty flavor.
Serving Suggestions
After baking a batch of chocolate chip cookies, it’s time to serve them up right. Here are some ideas to elevate your cookie experience.
Perfect Pairings with Chocolate Chip Cookies
– Best Beverages: The classic pairing with chocolate chip cookies is a glass of cold milk. However, coffee or tea can also complement the rich flavors beautifully. For a twist, try pairing them with a mocha latte or an herbal tea.
– Creative Serving Ideas: Transform your cookies into something special. Consider making ice cream sandwiches by placing a scoop of your favorite ice cream between two cookies. Alternatively, create a cookie sundae by crumbling cookies over a scoop of ice cream and drizzling with chocolate or caramel sauce.
Common Mistakes and How to Avoid Them
Baking can be tricky, and small mistakes can lead to less-than-perfect cookies. Here are some common pitfalls and how to avoid them.
Overmixing the Dough
Overmixing can lead to tough cookies because it develops gluten in the flour. Mix until the ingredients are just combined, and you’ll achieve a tender cookie.
Understanding the Impact on Texture
The texture of your cookies will largely depend on how you mix the dough. For a chewy cookie, mix less; for a cakey texture, mix more.
Not Measuring Ingredients Accurately
Accurate measurements are crucial in baking. Using a kitchen scale for dry ingredients can yield more consistent results than using cups, especially for flour.
Baking Too Long or Too Short
Timing is everything. Overbaking will lead to hard cookies, while underbaking may result in a doughy center. Keep an eye on the cookies in the last few minutes of baking, and remove them when they are just set and slightly golden.
Recognizing Signs of Overbaking or Underbaking
– Overbaked cookies will appear darkened and set all the way through.
– Underbaked cookies will look shiny and soft in the center.
Conclusion
Baking chocolate chip cookies is more than just a task; it’s an experience filled with joy and creativity. Whether you choose to stick with the classic version or venture into gluten-free or vegan alternatives, the essence of homemade cookies is unbeatable.
Experimenting with different ingredients and flavors can lead to delightful surprises, and sharing these treats with loved ones makes the experience even sweeter. So gather your ingredients, preheat that oven, and enjoy the delightful process of creating your own batch of chocolate chip cookies. Happy baking!
